PORCELAIN BY ANTOINETTE
  • Home
  • Workshops
    • Online Workshops >
      • Understanding Porcelain
      • Porcelain Handbuilding
      • Hand building Porcelain dinnerware
      • Wheel Thrown Porcelain Dinnerware
      • Wheel thrown Teapots
      • Pinching Teapots for Beginners
      • Glazing made easy
      • Pottery for the Beginner
    • International
    • USA workshops
    • Arts in schools
  • Shop
  • About
    • Statement
    • Biography
    • Publications
    • Resume
    • Portfolio >
      • Teapot portfolio
      • Sculpted porcelain bowls
      • Sculpted envelopes
      • Ice sculptures
    • Contact >
      • Frequently asked questions
      • Students comments
  • Blog
    • Articles
  • Glossary
  • Recipes
    • Glaze
    • Clay

Understanding and Preventing Cracks in Porcelain and Other Clay Bodies

1/26/2026

0 Comments


Working With Porcelain: Why It Isn’t Difficult—Just Different

Porcelain is often regarded as a challenging clay body to work with.  Potters who attempted it often like the medium, however some give up not understanding how to handle the medium. They perceive it as fragile, finicky, and tedious. However, my challenging personality and years of experience have led me to a different perspective. Today, I advocate for working with porcelain clay. While it is demanding,  the rewards and benefits make it all worthwhile. 
My Early Journey With Porcelain Clay
My first experiences working with porcelain, was unsuccessful. To make it worse, more experienced potters and instructors  intimidated me. In my early days of pottery I created simple forms, fired to cone 8.  
Much of my early porcelain work ended up in pit firings. I created incredibly thin porcelain pieces that were fired in pits. These works eventually helped me secure permanent residency for my family and me in the United States.  
Those early works evolved into sculptural pit-fired pieces that carried my emotions during a time that I was still griefing the loss of leaving my home country,  South Africa.
​Eventually, the heaviness lifted. I began seeing light, movement, and ballerinas in sheer dresses in my mind’s eye. Southern Ice porcelain became my medium of joy. Translucency, color, and light became symbols of the future.


Why Porcelain Cracks: Understanding the Real Causes 
Cracking in porcelain isn’t random—it’s usually caused by handling, design, firing, or glazing mistakes, to name a few.  Over the years, I’ve seen every kind of crack imaginable, both in my own studio and in work sent to me by students from around the world through TeachinArt.com.
Let’s break them down.
A hand-built porcelain sculpture by Antoinette Badenhorst featuring two parts. A small, round, white bowl with a green interior and a jagged rim sits within a larger, flat, white porcelain sheet that resembles a leaf or a large petal. The bowl has a small V-shaped opening on one side.
Sometimes, certain cracks are intentionally allowed. In this case, Antoinette Badenhorst stretched the clay over the balloon while it was being made. The bowl edges cracked. She, stopped it from going too far and enhanced the crack to give the bowl an organic appearance.
The underside of a cup with a s-crack.
S-cracks are easily formed when throwing off the hump. It’s essential to ensure that the bottom of bowls thrown in this manner are compacted properly.
This is a hand-built, altered porcelain bowl by South African ceramic artist Antoinette Badenhorst.  The artist specializes in translucent porcelain pieces, often featuring carved exteriors and glazed interiors, which form part of her signature work. Each piece is part of a larger theme of
Antoinette Badenhorst’s beautiful, translucent, sculpted porcelain bowl was photographed during a workshop in Simonstown, South Africa.
Porcelain isn’t difficult. It’s different.
Unlike stoneware or earthenware, porcelain is worked as clay but becomes something closer to glass when fired. Understanding that single truth changes everything about how you handle, design, and fire it.
A one-of-a-kind, wheel-thrown, altered, and carved translucent porcelain bowl. The sculpture features a flared, organic shape with multiple vertical folds resembling stylized leaves or petals that twist upwards from a narrow base. The exterior is a matte, unglazed cream or pale yellow color, while the interior is glazed in a smooth, glossy, pale lime green or yellow hue. The thin porcelain walls allow light to pass through, highlighting the delicate structure and the contrast between the exterior and interior colors.
One of Antoinette Badenhorst’s exquisite sculpted porcelain bowls.
Handling Cracks in Porcelain: What to Do and What to Avoid
Porcelain becomes extremely fragile as it dries because it contains less clay, than stoneware or earthenware. 
Key rule:
* Finish shaping and altering porcelain before it passes the leather hard stage
When porcelain starts changing color as it dries, it’s  too late to alter the clay without causing problems. 
How to Prevent Handling Cracks
  • Trim as soon as the base and rim are evenly moist.
  • Be extra careful with rims—they crack under  little pressure on the wheel head. 
  • Handle the semi-dry porcelain carefully. Even if you are successful in fixing a crack, it may show up in translucency. 
A translucent bowl that show how a fixed crack looks in translucent porcelain after is was fired.
This crack was fixed, however because of the particle alignment, it still shows in the translucent pot.
Showing the handle of a tray that cracked due to lack of particle alignment.
The cracks in one of Antoinette’s students’ trays were caused by weak particle alignment.
​Why Porcelain Handles Crack (And How to Fix It)
Many potters struggle with porcelain handles. The real culprit in most cases is particle orientation.
Clay shrinks in unison only when its particles are aligned and compacted evenly. A handle, unconditionally of the way it is formed,  has its own direction of particles, and when you attach it to a mug, it’s like two traffic flows meeting head-on.
You need an off-ramp.
How to Attach Porcelain Handles Successfully
  • Score and wet thoroughly. (remember slip particles are diluted and in disarray!)
  • Attach when both parts are equally moist
  • Compress and blend the joint well
  • Think about handles as foreign objects that must become unified with the form
If cracks still appear, look at possible mistakes in your design and firing schedule, not just the joint.
Sketch that shows how a potters should visualize the alignment of particles.
A diagram illustrates the flow of particles when a handle is attached to a porcelain mug.
Picture
This is a good example of particles in the handle of a mug that were not aligned with those in the mug wall.
Picture
The vase’s spout, too heavy for the sheet of clay it was attached to, tore and cracked open.
Firing Cracks and Dunting in Porcelain
Dunting happens when the kiln heats or cools too fast. It can occur in bisque or glaze firing.
If a piece comes out of the kiln split cleanly in two, or cracks days later with sharp, glassy edges—the cooling cycle is usually to blame.  
Dunts in bisque ware is not   common in porcelain clay, but glaze cracking happens often.  
How to Prevent Firing Cracks
  • Slow down your firing and especially the cooling schedule
  • Pay special attention to cooling around quartz inversion
  • Don’t rush porcelain through temperature changes
Preventing Design Cracks in Porcelain Work 
Porcelain must be formed evenly. Uneven thickness leads to slumping, tearing, and cracking.
At high temperatures, porcelain becomes  pyro plastic — it softens like glass. 

Design Tips for Porcelain
  • Keep walls consistent in thickness
  • Avoid heavy areas attached to thin ones. 
  • Heavy clay will be drawn towards the kiln shelf and will drag thinner clay along with it. 
A golden crystalline plate that broke in 3 pieces due to uneven firing.
This beautiful crystalline plate, exposed to uneven cooling in the kiln, broke into pieces.
This is a clear image of a dunting crack because of too much glaze on the inside of this bowl.
The glaze applied to the bowl was too thick, causing it to break into two pieces. This is a very clear example of dunting.
Over-Glazing: A common Cause of Porcelain Cracks
Too much glaze—especially inside forms—can split porcelain apart.
If glaze pools thickly in the bottom of bowls or vessels, it creates stress during firing.
​
Glazing Tips for Porcelain
  • Apply thin, even glaze layers
  • Avoid heavy pooling, especially  in the interior bottom of thin pots
  • Spray glazing is an effective technique for applying  glaze to thin porcelain. 
Spiral Cracks in Wheel-Thrown Porcelain
There’s a  misconception that porcelain must be thrown fast to prevent collapse. In reality, it’s advisable to throw porcelain slowly, with a deliberate focus on compacting the clay particles. Spiral cracks occur when certain clay parts remain misaligned and shrink unevenly. These cracks mostly become visible during the final firing process.

How to Avoid Spiral Cracking 
  • Throw slowly and meticulously. 
  • Compression should be applied uniformly to the entire object, including its interior, exterior, and base, considering both the inside and outside. 
  • Don’t rush. Form your pot deliberately and carefully. 
​General Tips to Prevent Base and Rim Cracks
  • Trim thin porcelain before it gets too dry
  • Attach a  a sponge bat on the wheel head to trim delicate rims on
  • Compact the base inside and out
  • Keep wall thickness even throughout
Sketches showing what various cracks look like.
These sketches from Antoinettes porcelain online classes illustrate the various cracks that may develop in porcelain due to uneven drying.
A crack showing on the inside of a dried bowl.
Is the lack of compression on the interior of the bowl due to insufficient compression, or could it be that the area where the wall and base meet was left wetter than the rest of the bowl?
Spiral cracks showing on this white bowl with leaflike decoration.
These are typical spiral cracks that either went unnoticed during the bisque kiln firing or occurred early in the glaze fire.
Small cracks on the rim of this porcelain bowl.
Tiny V-cracks have appeared on one of Antoinette’s students’ bowls. If these cracks are detected in time, they can be repaired.
Sketch showing what spiral cracks look like.
The sketch depicts a bowl to the left, with clay particles that were not uniformly compressed.
Dunting cracks showing on this wheel thrown porcelain plate.
This plate was subjected to uneven heating and cooling in the kiln, resulting in dunting.
  • Antoinette Badenhorst, a renowned potter, presents online classes and hands-on workshops worldwide. In 2014, she and her husband, Koos, founded TeachingArt Online School of Art. Together with other experienced and renown teachers, they provide comprehensive online courses for potters and artists globally. These comprehensive learning experiences are meticulously designed to enhance skills, boost confidence, and foster a deeper understanding of pottery, rather than offering mere demonstrations. 
This crack was seen on the bottom of a vessel before it was fired.
This crack is related to s-cracks and due to uneven drying.
This little porcelain cup cracked from the rim almost to the bottom.
This little cup was made by one of Antoinettes students. It looks like the crack was formed during firing. The glaze curls into the crack, therefore this is not dunting from the glaze firing.
Typical s-crack on the bottom of a cup.
This crack likely occurred because the base was drying on a non-absorbing bat. Alternatively, it may not have been cut loose from the bat after it was thrown.
The sketch shows how a v-crack look on a mug when the rim dries faster than the body.
The sketch from Antoinettes online classes with TeachinArt illustrates a V-crack that forms when the rim dries more quickly than the base.
This cup shows a dunting crack that appeared after it was used for a while.
This crack is most possibly due to glaze that was too thick for the body.
 If you enjoyed and gained something from this blog post, please share it with your friends. Unfortunately, I won’t be traveling abroad this year because I need to catch up on my studio work and am also writing a book. 
Details of my next ​porcelain workshop is available  on the Workshop page
TAGS
porcelain clay, working with porcelain, porcelain pottery, porcelain cracking, porcelain firing, porcelain handles, wheel thrown porcelain, translucent porcelain, porcelain glazing, how to prevent cracks in porcelain
0 Comments

Is this porcelain that has been well-fired and is suitable for use in the microwave?

1/16/2026

0 Comments

 
In this quick video, Antoinette demonstrates how to whip up a breakfast bowl in the microwave using a small porcelain casserole dish she renamed as  her “brunch-lets.” The porcelain handles remain cool while warming up in the microwave because the clay has almost no absorption, thanks to its vitrification process during firing.  
•
​The video  highlights the risks of using ceramic or porcelain dinnerware in a microwave, specifically noting that porous clay bodies can trap water, causing the item to overheat while the handles remain cool. The speaker recommends porcelain (specifically referencing bone china/white clay) as the best medium for durable, high-quality dinnerware. Moving forward, the discussion will focus on clay and glaze chemistry to ensure safety and quality, noting that technical challenges remain in creating ideal, chip-resistant, and microwave-safe pieces

Examples of Antoinettes  brunchlets

Defining Brunchlets:
​
Antoinette came up with the fun name “brunch-lets” for these little casserole dishes—they’re so much more than just egg cookers! These bowls are perfect for making a full breakfast, lunch, or a quick snack for one person. ​

Picture
One of Antoinettes earliest brunchlets, resembling an egg cooker.
Picture
Cup-sized brunchlets with long handle, large enough for a single meal in the microwave.
Picture
Cup sized brunchlet with two handles like a regular casserole dish, suitable for the microwave.

What are the primary distinctions between hard-paste porcelain, soft-paste porcelain, and bone china? ​​

Kinds of porcelain 
Historically, there are three types of porcelain: hard-paste porcelain, soft-paste porcelain, and bone china.
Hard-paste porcelain is made from clay that becomes glass-like when vitrified. It primarily consists of kaolin, silica, and Feldspar. The firing temperature of the clay depends on the temperature range of the Feldspar, and it is typically fired between 1200-1400 °C.

Antoinette, a renowned potter, teaches many potters worldwide in either online or hands-on classes to work with porcelain clay.

Soft-paste porcelain was developed in Europe during the time alchemists were searching for porcelain, which was originally imported from China. It was made from fine clay, sand, and glass. Unlike earthenware, soft-paste porcelain does not withstand high temperatures and will begin to collapse before reaching vitrification. It was often used for making ornaments.
​
Bone china was developed in England when cattle bones were used to enhance the properties of soft-paste porcelain. The result was a very dense, strong, and glass-like, white, and translucent material. Historically, bone china contained 25% clay (kaolin), 50% bone ash, and 25% Cornish stone. In modern times, bones are replaced with a synthetic calcium phosphate, specifically dicalcium phosphate or tricalcium phosphate, which serve as powerful fluxes. Some artists, such as John Shirley, create artistic bone china bowls. Most people recognize bone china as the dishes displayed on their grandmother’s special shelf, commonly referred to as “chinaware.”  
There are other porcelain types that came along later, like Belleek porcelain, which is still crafted in Belleek, Ireland. America really helped shape this porcelain, and I’m writing about it in my book that’s still in progress. Also, there’s parianware, which is a different kind of porcelain made to be used without glaze, which I addressed in one of my Ceramic Monthly articles. Curtis Benzle creates his own version, so he can leave his sculpted bowls unglazed. 

Picture
This porcelain casserole dish, designed by Antoinette Badenhorst, is great for microwaving and, under specific conditions, can also be used in the oven. Antoinette is also a porcelain instructor at TeachinArt.com
Picture
John Shirley, a teacher at TeachinArt.com, makes beautiful bone china vessels by painting them with soluble salts to create vibrant colors.
Picture
Curtis Benzle, a teacher at TeachinArt.com, has created a porcelain piece that’s quite similar to parianware. He’s also using the Japanese Nericomi techniques to bring out the luminosity and color in his work.

Clarifying some terminology


Vitrification
Porcelain turns into vitrified glass when it’s fired for a long time at a high temperature, which fuses the clay particles into a dense, non-porous material. When the clay has a .01% imperviousness, it becomes food safe. This glassy bond keeps liquids from seeping into the handles, so there’s no steam buildup that can burn your hands when you use it in the microwave.
Besides making it microwave-friendly, this also makes it more durable because steam inside the walls of pottery can shorten its lifespan. 
Just a heads-up, porcelain can get pretty hot, as the heat from your food will transfer to the bowl or cup. That’s why handles are so important—they let you grab it safely from the microwave.

Water absorption in clay
If your pottery isn’t watertight, it might mean it needed a higher firing temperature to make sure the clay particles fusetogether. Or, if it was fired at a lower temperature, the melting agents (fluxes) should have melted at a lower temperature too. If the glaze doesn’t fit perfectly, liquids can also sneak into the clay. You might see tiny cracks on the ceramic container. When liquid seeps into the clay walls, it can take ages to dry out. So, if you use it in the microwave, steam might escape and burn your hands. Also, if you wash it in a dishwasher, harsh chemicals could damage it. The real danger comes when bad bacteria from dirty dishwater gets into the clay walls.

Bone China Versus Porcelain 
Bone China, because it is not plastic enough, needs to be slip cast, while all pottery techniques can be used to create porcelain. 
Recipe for Creme Brûlée in a brunchlet: ​
Enough for 4 servings: 
3 large eggs
3 table spoons of sugar
3/4 cup of cream
1 teaspoon Vanilla essens
A pinch of salt
Instructions: 
​Mix all ingredients together and divide in 4 brunchlets
Place in the microwave for 45 seconds. Stir and put back for another 30-45 seconds ( different microwaves will cook differently)
Sprinkle sugar or spread a jelly of your choice on top. Place under broiler until golden brown. 
Tags:
#porcelain #ceramic #pottery #clay #pottersofinstagram #vitrified #kiln #clayart #potterylife #ceramicstudio #hardpasteporcelain #bonechina #parianware #glazechemistry #handmadeceramics #brunch-let #vitrificationinclay #Waterabsorption #
#microwavecooking #microwaveSafe #kitchenhacks #brunchlets #breakfastbowl #oatmealbowl #microwavemeals #easybreakfast #safeDinnerware #kitchenSafety 
#potteryclasses #antoinette #ceramicmonthly #tablescape #homedecor #functionalart #interiordesign
 ​
0 Comments

Learn more about the Secrets of Porcelain : How to work and build a relationship with this clay medium.

1/16/2026

0 Comments

 
Working with porcelain clay may scare you in the beginning but once you've learned how  porcelain differs from other clay mediums, you will be hooked and really enjoy to work with it. 
  • A note from Antoinette:

  • During those early days of presenting workshops globally, my English language skills were still developing. Although I still occasionally struggle to find my words in English, my proficiency has improved significantly, which I am very grateful for. Growing up and even as a young adult, despite being exposed to English,  Afrikaans was our main language.  
Hand building porcelain can be as easy or as intricate as a potter wants to do it. Antoinette likes to use translucency in her sculpted porcelain bowls. She use any clay technique to create her ceramic art.
Antoinette shares some of her porcelain secrets in this behind-the-scenes look at one of her first porcelain workshops in Canada. She shows how you can take a leather-hard porcelain bowl and safely bring it back to a soft, workable state—then reshape or sculpt it into a beautiful new form.
You’ll see how she creates a press mold and turns it into a bowl, while explaining why it’s important for potters to truly understand porcelain as a material and build a relationship with it.
Antoinette likes to call porcelain a “diva” 😄 because it has its own personality and needs to be handled with care. She even touches on the history of porcelain to help explain its unique characteristics.
The video features highlights from her hands-on workshop, where she teaches both handbuilding and wheel-throwing techniques. Since that first workshop, Antoinette has gone on to teach porcelain classes around the world

Picture
Orange press molded porcelain bowl, envelope formed on a wheel thrown pedestal.
Picture
Chartreuse green press molded porcelain bowl, envelope formed on a wheel thrown pedestal.
Antoinette's porcelain classes whether it is online or hands-on is loaded with explanations and tips and is suitable for beginner to advanced potters.  She provides a variety of porcelain tips and compare them with regular pottery techniques. Her workshops are normally a mix between wheel throwing and hand building techniques. See Antoinettes Ceramic Workshops
#PorcelainSecrets
#WorkingWithPorcelain
#PorcelainClay
#CeramicTechniques
#PotteryTips
#HandbuildingCeramics
#WheelThrowing
#PorcelainWorkshop
#CeramicArtist
#PorcelainByAntoinette
#AntoinetteBadenhorst
#StudioPottery
#ClayLife
#CeramicsEducation
0 Comments

Kilns suitable for porcelain

5/4/2021

0 Comments

 
Porcelain has long had the reputation of being a difficult clay body to work with. Much of this reputation comes not from forming the clay, but from understanding the firing process. Porcelain responds very specifically to heat and temperature, kiln design, glaze fit, and especially to the way it cools after firing.
By understanding the relationship between raw materials, firing temperature, and cooling cycles, potters can make informed decisions about kilns, clay bodies, and firing schedules that lead to strong and reliable porcelain work.
Now that we have to established the concept of porcelain and the distinctions between high-firing and low-firing types, and how to determine the appropriate kiln for your studio needs.

 The Tradition of High-Firing

Picture
David is one of the instructors at Teachinart. See his profile here: Click on the image to go to his profile.
​If you are a "purist" who believes only in high-fired porcelain, you may find yourself drawn to wood firing. This was the original process used when porcelain was a secret known only to the Chinese. Wood firing offers a unique interaction between fly ash and the clay body that modern kilns struggle to replicate.
However, if your goal is a reliable studio experience with the authentic appearance of porcelain, any firing range from Cone 6 to Cone 10 should suffice.
Low-temperature porcelain requires a carefully balanced recipe. A helpful analogy is a cake that appears golden brown on the outside while still raw inside. The surface may look finished, but internally the material has not fully matured.
To achieve translucency at lower temperatures, the clay body often needs more glass-forming materials and less clay. While this promotes vitrification, it also reduces the plasticity of the clay body, making it more difficult to work with.
Plasticizers such as bentonite, Macaloid, or Veegum T may be added to enhance workability. However, these materials introduce additional variables, including changes in drying behavior and shrinkage and thixotropy of the clay.
Historically, soft-paste porcelain was developed in Europe as an attempt to imitate Chinese porcelain before the true formula for hard-paste porcelain was understood. Although beautiful, soft-paste porcelain is generally weaker than traditional high-fired porcelain.
Picture
Wood fired translucent porcelain bowl by David Voorhees
Picture
Translucent sculpted porcelain bowl by Antoinette Badenhorst

The Limits of Electric Kilns

Picture
Functional porcelain objects by Antoinette Badenhorst.
Beyond these temperatures, the technical challenges mount. Firing exceeding 1285°C (2345°F) requires stable fluxes to work with refractory silica and kaolin, melting the clay into glass while maintaining its form.
To my knowledge, standard electric pottery kilns rarely reach temperatures higher than Cone 12–14 (1360°C). If you are aware of a manufacturer producing electric kilns capable of exceeding Cone 14, please share that information in the comments!

The Science of Low-Fire Porcelain

Firing below 1220°C (2228°F) is possible in almost any kiln, but the chemistry changes. At lower temperatures, we must use frits—expensive, factory-produced fluxes.
The challenge here is that silica and kaolin are highly refractory (resistant to melting). If the heating isn't perfectly even, you end up with excess free quartz, which weakens the ceramic because insufficient cristobalite forms.
The Cake Analogy: Low-firing porcelain is like a cake baked golden brown on the outside but raw in the middle. It requires a delicate balance of raw materials, making the recipe "fussy" and prone to failure if mining sources change.
To achieve translucency at low temperatures, you need more glass-forming materials and less clay. This makes the clay less pliable. While plasticizers like Bentonite or VeeGum T can help workability, they introduce their own set of complications.
Picture
Note the thick glaze layer in this bowl. In this case the glaze application was too thick and the bowl dunted.
Picture
Terra sigilata shiver off the clay body
Picture
Low fired Porcelain by Bryan Hopkins.
Picture
Porcelain cup with crazed glaze.
Picture

Understanding the "Body-Glaze" Bond

Common Firing Defects
Defect
Cause
Appearance
Crazing
Glaze contracts faster than the clay during cooling
A network of fine cracks in the glaze.
Shivering
Clay contracts significantly more than the glaze.
Glaze peels off like paint chips; edges are razor-sharp.
Dunting
Cooling too fast, creating thermal shock. Too much glaze in comparison with the clay can also cause dunting. 
The pot cracks or breaks in two (sometimes weeks later).
Because porcelain is a dense material containing 10%+ cristobalite, it is highly sensitive during two critical cooling periods:
  1. 573°C (1063°F): The Quartz Inversion.
  2. 226°C (439°F): The Cristobalite Inversion.
If the kiln cools too quickly during these windows, the tension will break the piece.

Recommendations for Buyers:
  • Electronic Controllers: Highly recommended. They allow you to program a "slow cool" or "down-fire" to ensure the clay and glaze contract in concert.
  • Manual Control: If you don't have a controller, close all vents (peep holes) once the kiln reaches a "yellow-orange" heat (approx. 1000°C) to prevent drafts.
  • The Golden Rule: Never open the kiln above 200°C (392°F). Sudden airflow can cause a delicate piece to disintegrate instantly.


    Pro Tip: Using SaggarsIf you fire in a community studio or a mixed kiln with stoneware, consider using saggars. These lidded containers act as a "kiln within a kiln," protecting the porcelain from drafts and slowing the cooling process naturally.
Picture
Kiln controler to make sure the speed of the firing is under control.

Final Thoughts

Working successfully with porcelain requires understanding more than just the clay itself. Firing temperature, glaze fit, cooling cycles, and kiln design all play critical roles in the strength and durability of the finished piece.
When potters respect porcelain’s need for controlled heating and especially slow cooling, they unlock the remarkable qualities that have made porcelain one of the most admired ceramic materials in history.
Picture
One of the clay tests for a translucent ^6 porcelain. The flux was too powerful. Seem ore about this under clay recipes.
Antoinette present porcelain workshops in her studio as well as online the TeachinArt
High-fire porcelain, Low-fire porcelain, Electric kilns for porcelain, Kiln cooling cycle, Crazing,  Shivering, Porcelain translucency. porcelain pottery, firing porcelain, porcelain kiln firing, ceramic firing temperatures, cone 10 porcelain, pottery kiln guide, porcelain glaze fit,
crazing and shivering, dunting in ceramics, ^6 porcelain clay, ceramic materials science, porcelain cooling cycle, pottery kiln tips, 

RSS Feed

0 Comments

How to make a musical instrument from clay

9/2/2020

0 Comments

 
Picture
These porcelain ocarinas is unfired. It is possible to play them unfired. Their sound will change when the clay shrinks. Due to its character, porcelain may be fired differently than other clay bodies.

Make an Ocarina with the pinching clay technique

Some years back while I was working for the first time in the Whole Schools Program in Mississippi, I studied the craft of making ocarinas from clay, so that I can teach school children how to make ocarinas. It is a fun project in which children can be challenged. It is also possible to keep them engaged with the object long after they made it. For some it may become a challenge to learn to make ocarinas that are in tune and it is one of those projects that can become a lifelong hobby or even a career, either as a musician or ocarina maker. It is possible to make many other kinds of musical instruments from clay too. 

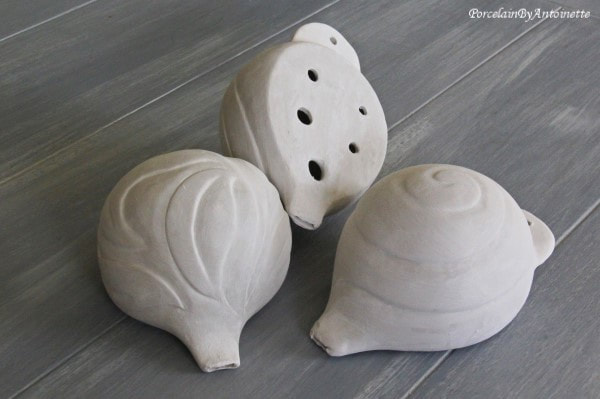
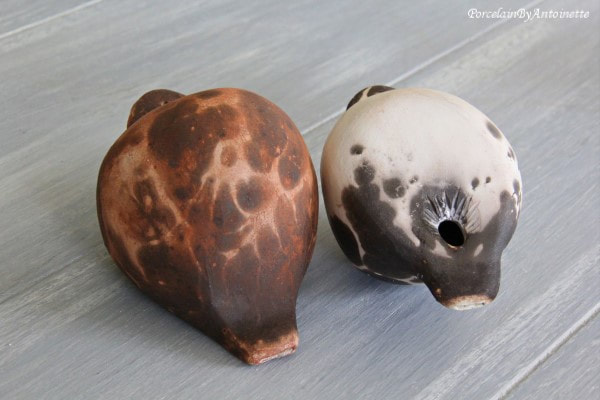
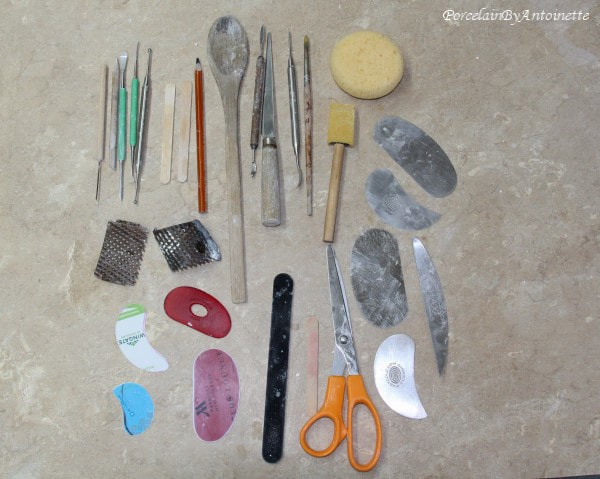
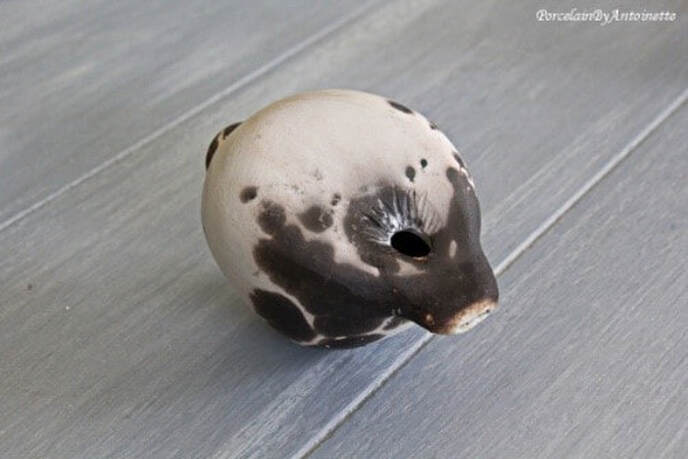
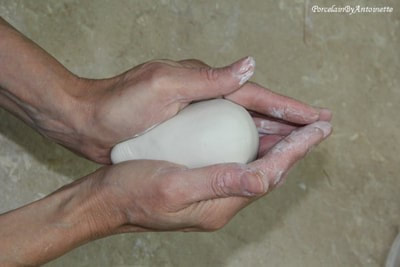
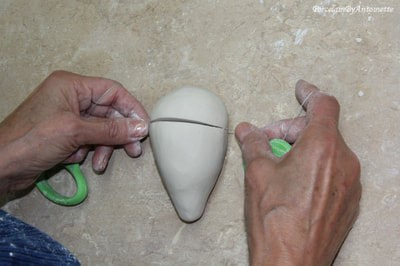
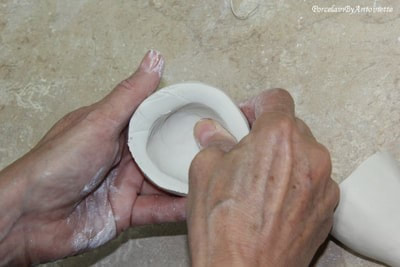
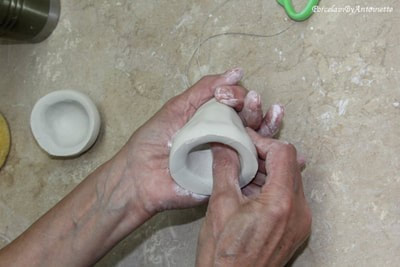
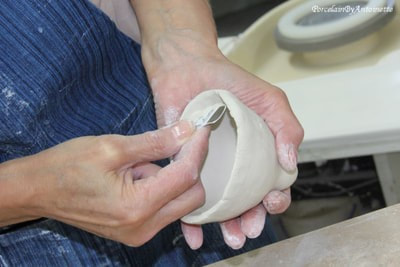
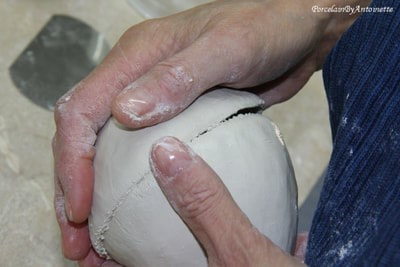
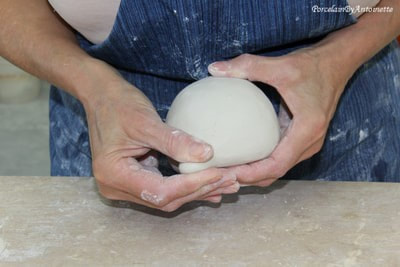
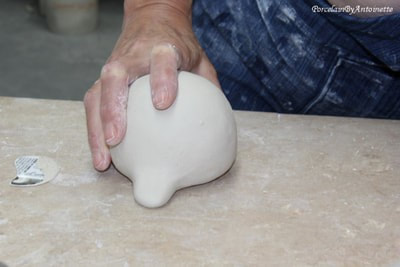
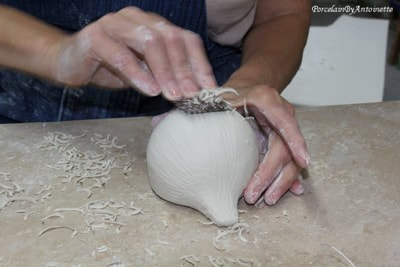
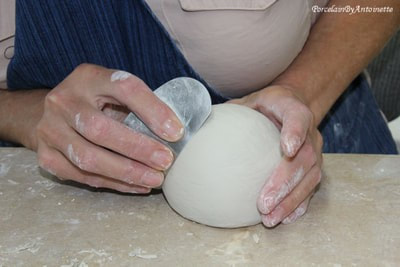
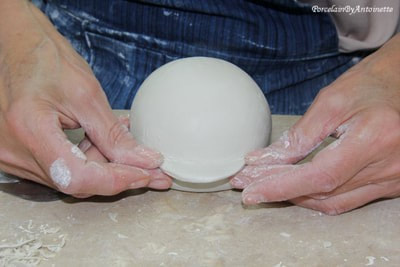
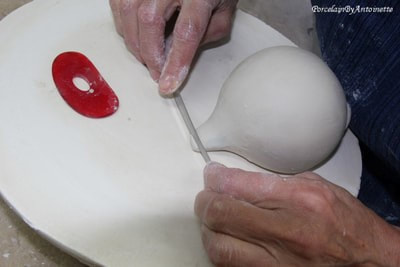
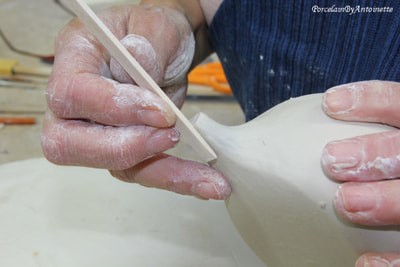
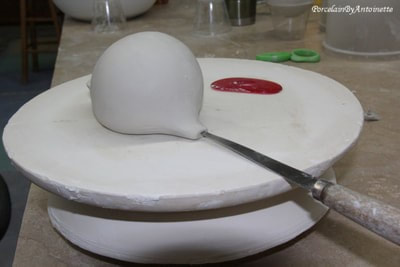
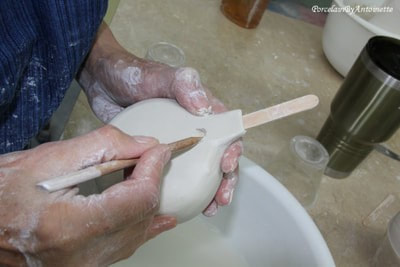
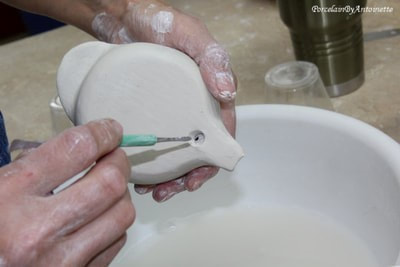
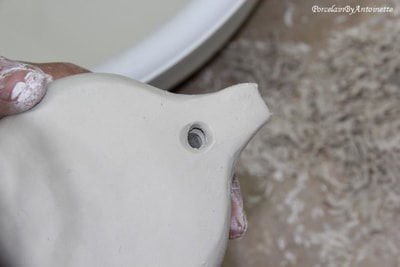
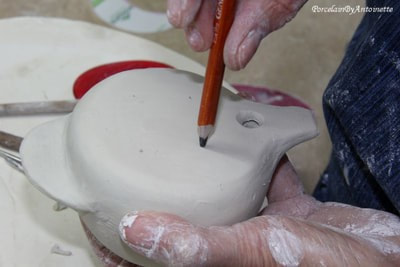
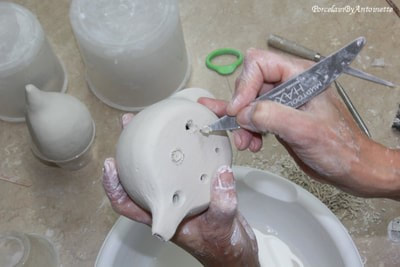
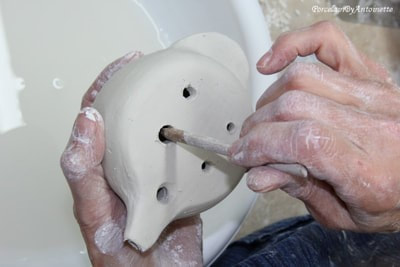
Whistles and ocarinas. 

An ocarina is a whistle that can make different musical notes placing your fingers over a set of holes and blowing into the air duct. It is possible to play a tune with at least 1 full octave.
 
It is good to know how to make a whistle first and once you mastered the single note instrument, you can take the next step to make an ocarina.
 
The first thing that should happen is that you get sound, so before you get into the musical scale of an ocarina, make sure you make a good whistle.  Your first ocarina may be off pitch, since it is a little harder to create the perfect holes, but it is not impossible. To be able to do that, may require some experimentation and a reliable pitchfork.
 
The most elementary ocarina has 4 holes. The smallest hole is the furthest right side, away from the mouthpiece. Going clockwise the holes should double in size from the previous one in order to obtain one octave. If the sound box (belly) of the ocarina is bigger, the sound is deeper; going higher the smaller the ocarina becomes.
Picture
Whistles that was treated in an obvara firing with Marcia Selsor.
Picture
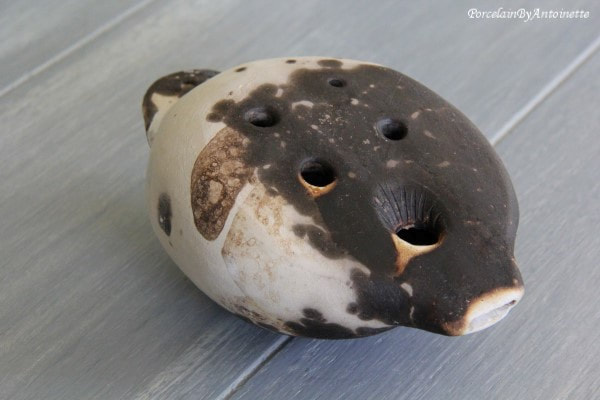
Ocarina treated in an obvara firing with Marcia Selsor when we videotaped her Alternative Firing online workshop.
You will need a few basic tools and clay
It is possible to make these ocarinas from a self drying clay although real pottery clay made from earth will be the easiest to use. If you add paper to the clay and seal it afterwards with glue, paint or some kind of lacquer, it will be hard enough to last.
Other tools needed are:
Sponge,
Sharp(point) knife (fettling),
Surform blade,
Metal kidney.
Needle tool,
Sharpened flat popsicle stick, or flat bamboo (like a chisel)
Round pencil or dowel stick with a sharp point
Sponge on a stick.
Paint brush
Metal kidney
Serated blade
Plastic cards
Picture
3. A view of the right angle.
Picture
A basic whistle has only one note.
Keep a damp sponge close by to keep your fingers moist and to smear small stretch marks away. 
Blow into the air duct to hear a clear sound. If the sound is not clear, it means something is obstructing it. 
If the clay is too soft it is difficult to clean out well. 
Bear in mind that you need enough space on top to drill a sound hole and at least 4 note holes in;
Form a round belly (sound box) for the ocarina, but the top somewhat square and flat.
Form the sound hole and air duct just as with the whistle. I like to widen my sound hole. It is also a good place to allow debris escape from the inside of the belly.
Beginning with a small hole, as wide as a pencil lead. Double the size when forming each hole, going clockwise.
When you form the air duct, make sure that the air flow is open, by having no obstruction between the sound hole and the air duct.
The sharp beveled edge of the sound hole and the air duct should be level with each other to allow a steady stream of air through.


Tips to be successful with making ocarinas
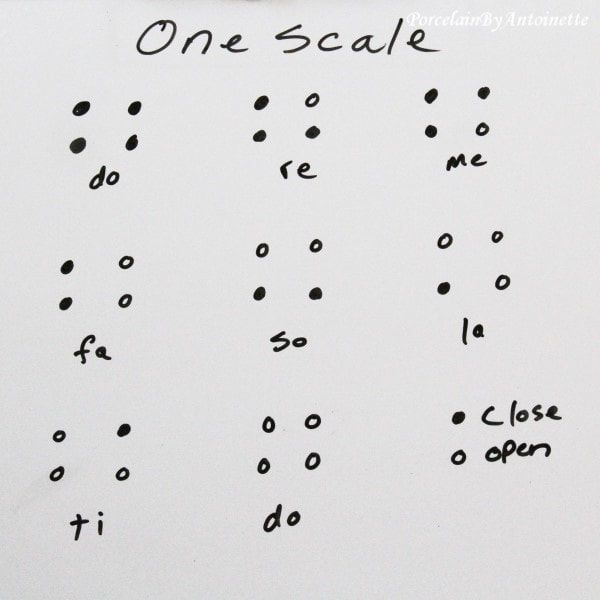
Picture
Note chart.

Pinching a Teapot
Pinch pots: Is it beginners pots or a good place to begin?
Arts Integrated programs in schools
​Handbuilding pottery for beginners
Karen Bailorlink
This was wonderful! I would like to try it sometime. Thank you so much!!
Karen

0 Comments
    Blog

    Categories

    All
    Agateware
    Arts Integration In Schools
    Begin A Pottery Business
    Clay Flute
    Clay Slabs For Dinnerware
    Colored Clay
    Cracks In Pottery
    Destruction-of-art
    Figurines
    Glazes
    Glazing
    Kilns Suitable For Porcelain
    Kitchenware
    Microwave Safety
    Mississippi Arts Commission Fellowship Report
    Ocarina
    Painting
    Pinching Clay
    Porcelain Tips
    Porcelain Workshop
    Pottery In Pretoria
    Salt In The Pitfire
    Understanding Porcelain
    Wheel-throwing

    RSS Feed


Online workshops
Understanding Porcelain ​
​Hand building Porcelain
Hand building porcelain Dinnerware
Wheel throwing Porcelain Dinnerware
Wheel thrown Teapots
Pinching Teapots for Beginners
​
Glazing Made Easy
​Pottery for Beginners
​
Pinching Porcelain Teapots
Porcelain hands-on workshops
Workshops in the USA
International Workshops
Social media
Facebook 
Google Business
Instagram 
LinkedIn
Pinterest

TikTok
​X.com
Contact Antoinette

  • Home
  • Workshops
    • Online Workshops >
      • Understanding Porcelain
      • Porcelain Handbuilding
      • Hand building Porcelain dinnerware
      • Wheel Thrown Porcelain Dinnerware
      • Wheel thrown Teapots
      • Pinching Teapots for Beginners
      • Glazing made easy
      • Pottery for the Beginner
    • International
    • USA workshops
    • Arts in schools
  • Shop
  • About
    • Statement
    • Biography
    • Publications
    • Resume
    • Portfolio >
      • Teapot portfolio
      • Sculpted porcelain bowls
      • Sculpted envelopes
      • Ice sculptures
    • Contact >
      • Frequently asked questions
      • Students comments
  • Blog
    • Articles
  • Glossary
  • Recipes
    • Glaze
    • Clay