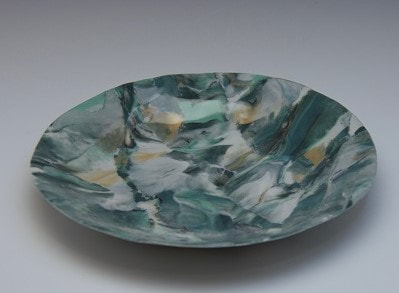
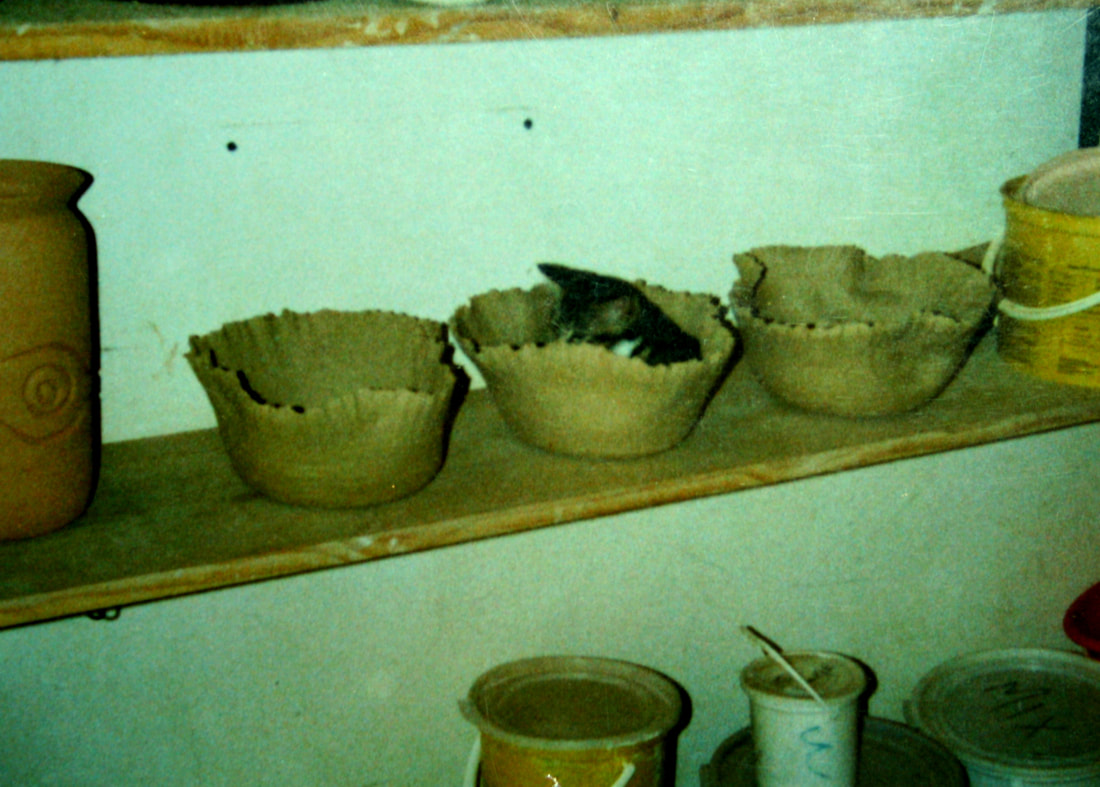
This technique is often done in hand building since it is a little harder to prevent overworking and too much blending of the colors on the pottery wheel.
When I wrote the notes in the book that I compiled with articles from Ceramics Monthly, a few artists that was included in the book was Naomi Lindenfeld, Cory Brown (who laminated porcelain on stoneware clay) and Chris Campbell, who is mostly a hand builder and instructor in colored clay. My notes was loosely based on my general knowledge of clay compatibility. Little did I know that it will circle around in my study field a year later. How I used the awarded fellowship. |

| | |
| | |
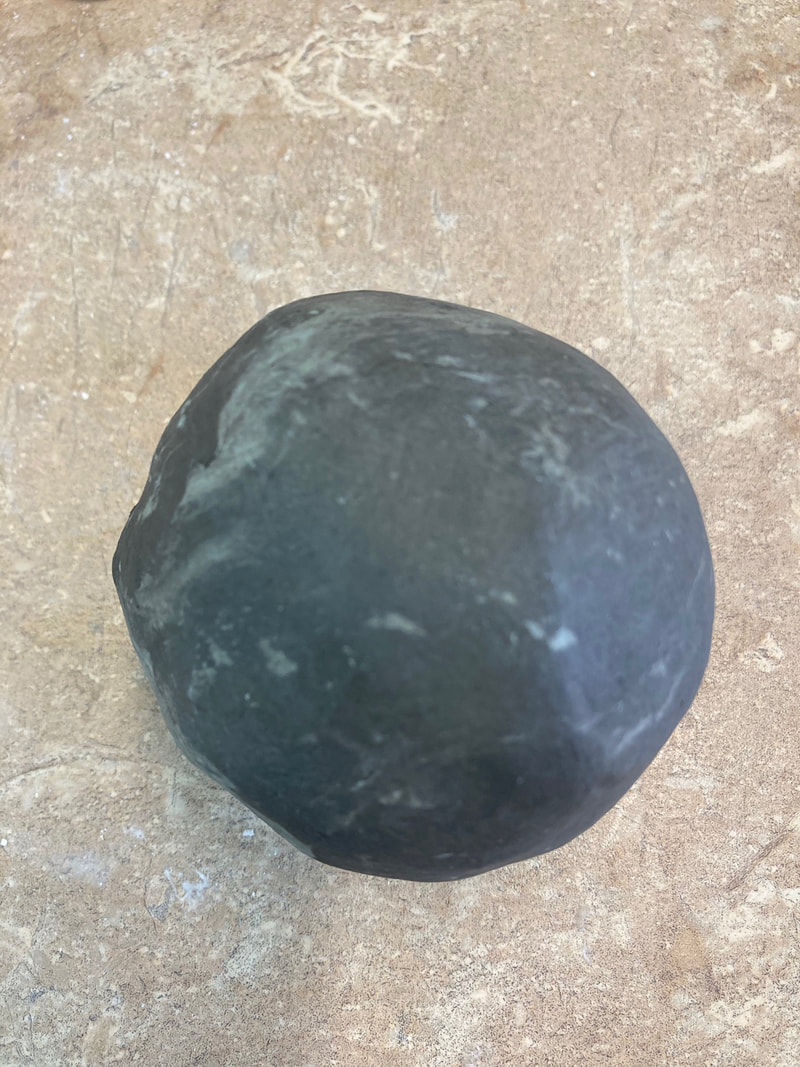

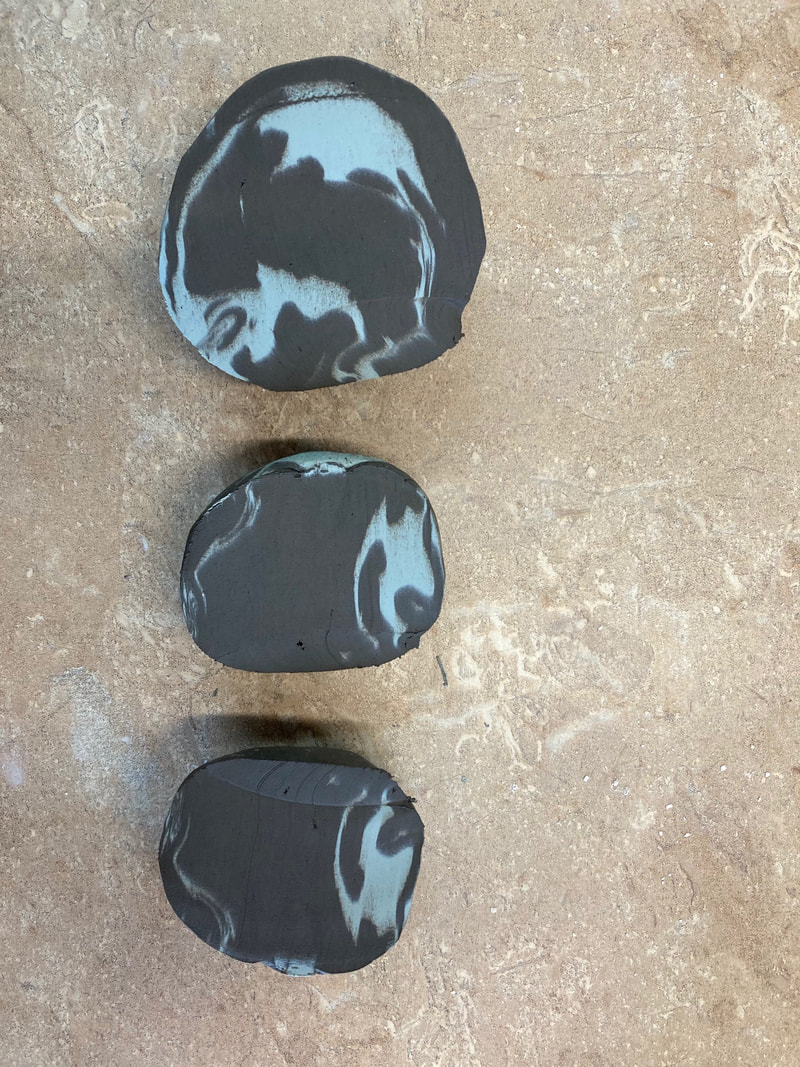
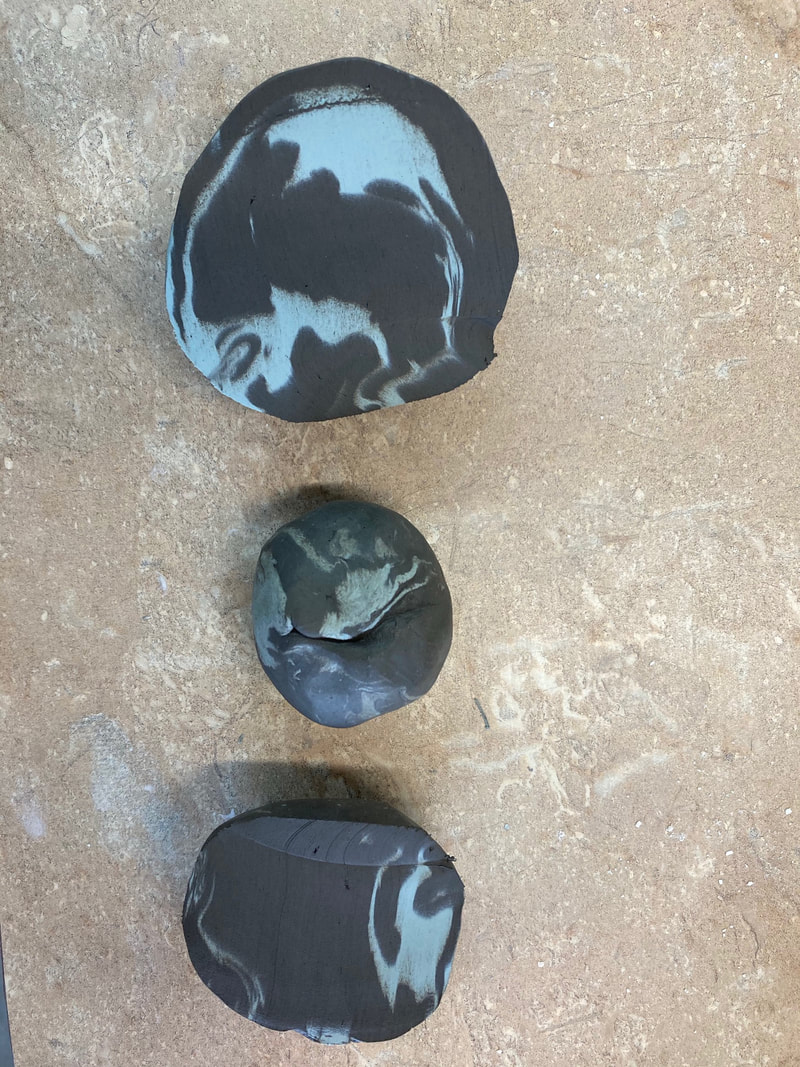
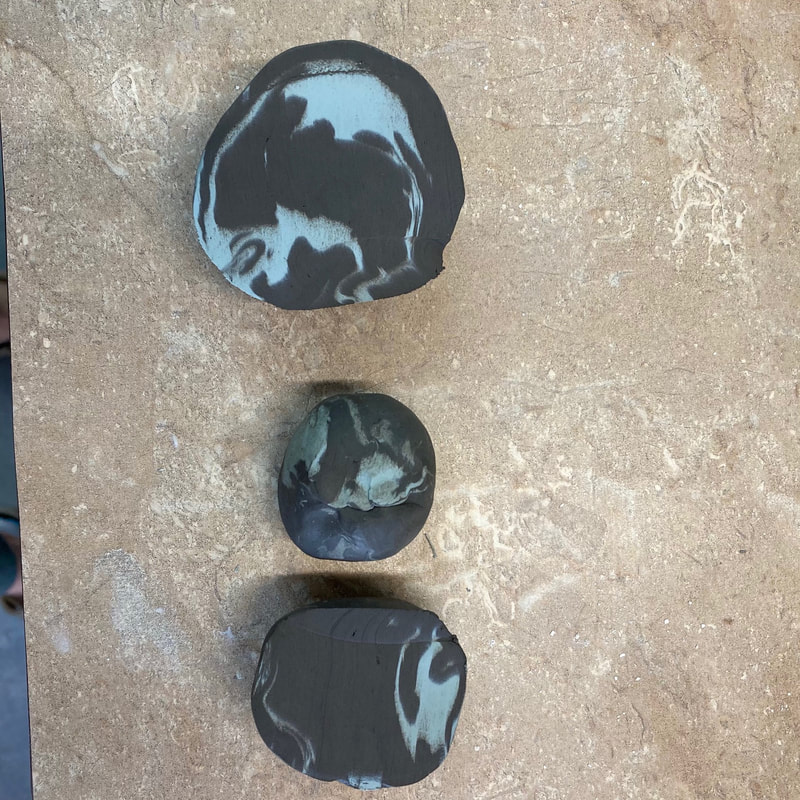

My observations this far is interesting:
- When light and dark clays are mixed, it is very easy for the dark to overpower the lighter color.
- Drying stages will reveal color better than when the clay is still wet.
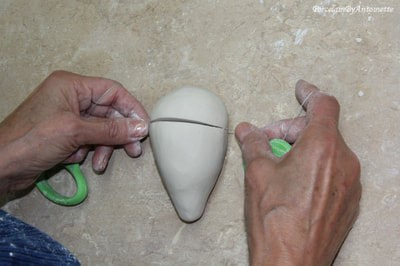
- It is possible to manipulate pinch pots into twin pots when the original clay ball is divided in 2 exact equal parts.
- It is very easy to overwork the clay and eliminate the color contrasts.
- The deeper scraping, the more color reveal..... or eliminate.
Questions on my mind:
- How can I incorporate color clay into my own work style, without getting to far of from my style.
- How can I keep the message simple, but intricate at the same time.
- How will I develop a distinct color pattern without stepping into the field of potters like Curtis Benzle, Judith de Vries and Maria ten Kortenaar.
TeachinArt Online classes
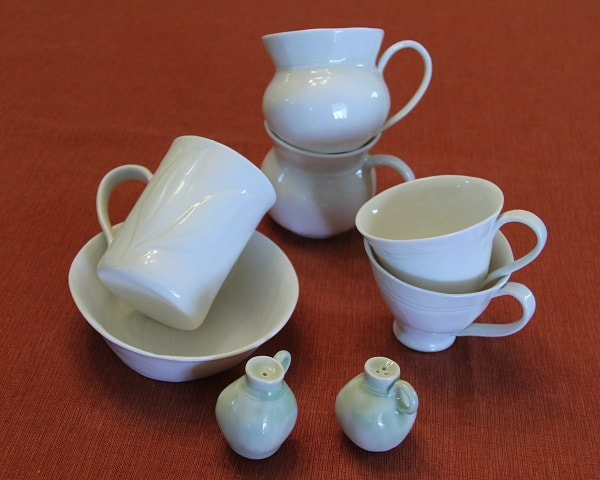
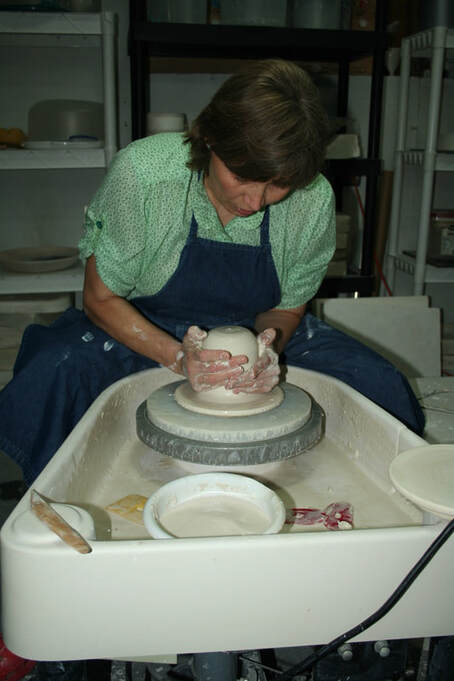
Antoinette Badenhorst teaches porcelain classes as well as other pottery classes online with TeachinArt She has 40 years of experience is teaching and mentoring potters of all ages. Antoinette has been an online instructor since 2014 with students in 41 countries. She also teaches hands- on workshops in countries across the globe. Below are a few images from her workshops online or otherwise.

Curtis Benzle has two classes with TeachinArt:
Colored Clay is his charter class.
All Artists making a living (AAMAL) is a comprehensive study in which Curt goes through the nitty gritty trouble and solutions that artists run into every day. He provides detailed information about art and the law and how to make the law work for you instead of the lawmaker. He address marketing and sales issues in art and how to make it work, even when you are shy to sell your own work or services. Curt goes to the core of what make artists fail or become a success story. Whether you are the most talented or a mediocre artist, without identifying all the ways to "climb the ladder", success will always be one heartbeat away, unless you work to get it.
With his 50 + years of experience in clay and art in general, many many students learned from him.
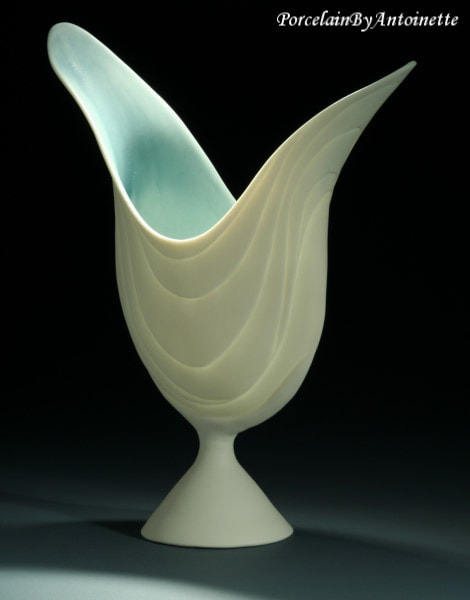
The images below shows some of the art pieces that Curtis did in a production business.
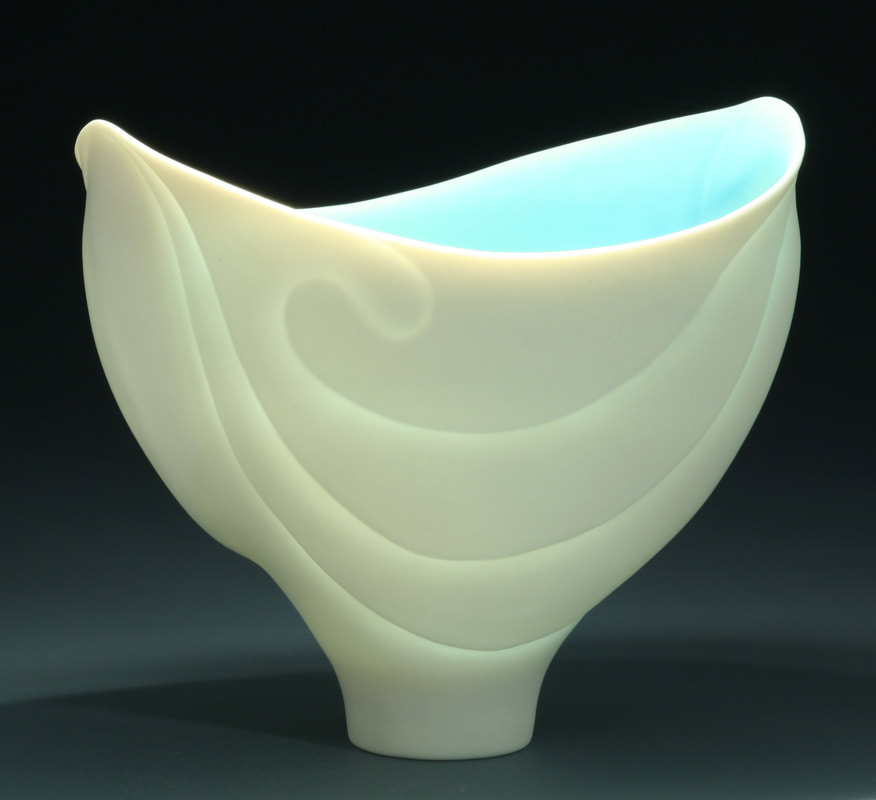
One of the signature pieces by Curtis Benzle. The image landed on the cover of Ceramics Art and Perception as part of the article "Porcelain a diverse medium for Modern Times" by Antoinette Badenhorst.
2 Comments
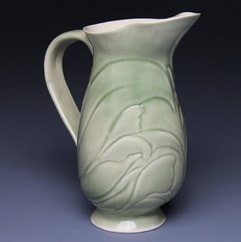 | This jug is built from a slab. Learn how to do that in the virtual Hand building Porcelain Dinnerware class. If you do not work with porcelain clay, any smooth clay body, for instance B- mix from Laguna clay Company will be suitable. How does it work? Koos and Antoinette video taped the classes and you get 10 weeks of viewing time. You receive reviews, have direct access to Antoinette and to other student questions. |
NOW SEE WHAT ALL YOU CAN LEARN AND DO IN THE HAND BUILDING DINNERWARE CLASS
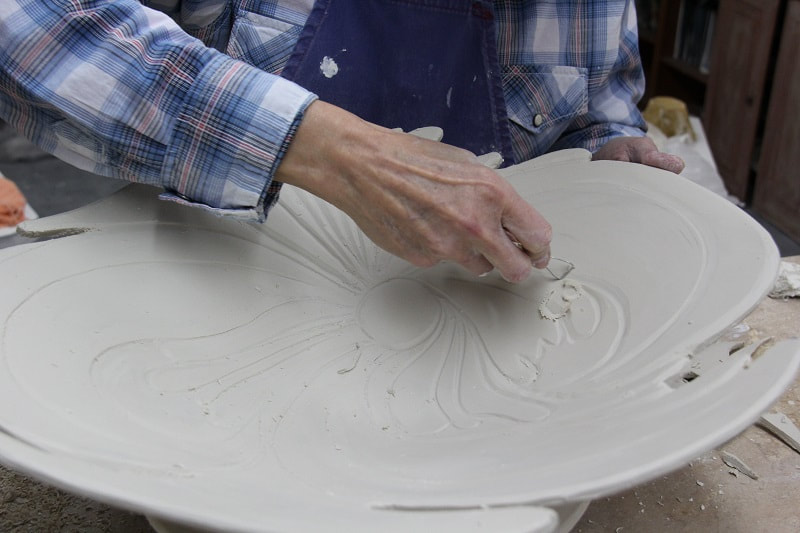
How to throw a clay slabBegin by pounding the clay to about 2" thick on the table surface. Pound in all directions so that the clay particles stretches evenly. | 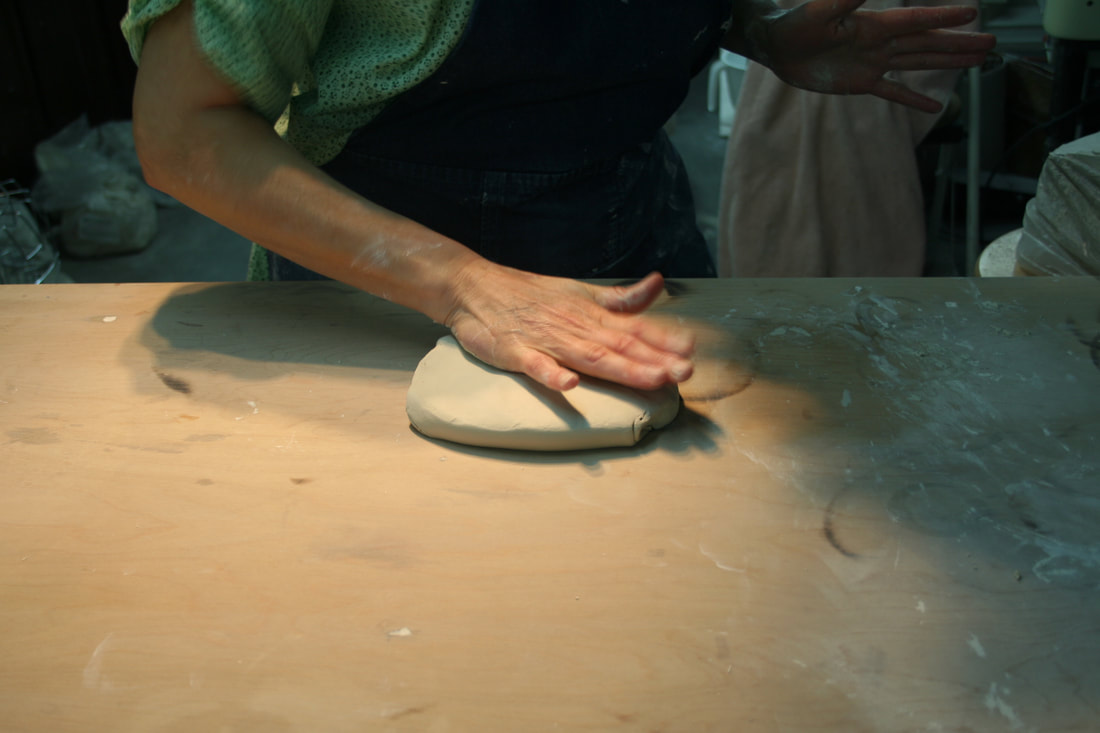 |
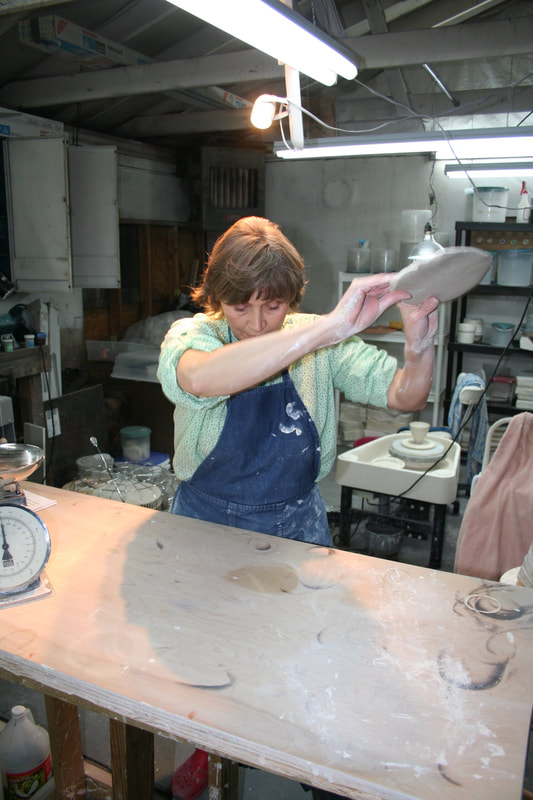 Start to throw slab previously pounded on. | Lift the slab up and bring it down on the table surface so that the middle of the slab touches the surface first. Imagine this is a tablecloth that you want to drape over a table. If the edges touches first, you have to pick it up and drape again. This is not a forceful action. If the clay is soft enough and pliable, it will stretch with a light touch. |
| When the clay edge touches first, you thin the edge and not the whole slab. Do not use force. Move your body like swinging a golf club when you throw the slab. In doing so, turn somewhat sideways and let your body swing along. If you slam it down too hard, the clay will stick to the table. Every time you pick the clay up, do it from a different place. You want the clay particles to spray evenly in all directions. Remember to re compact the clay before you start cutting or forming the slab. If needed reinforce with a roller. | 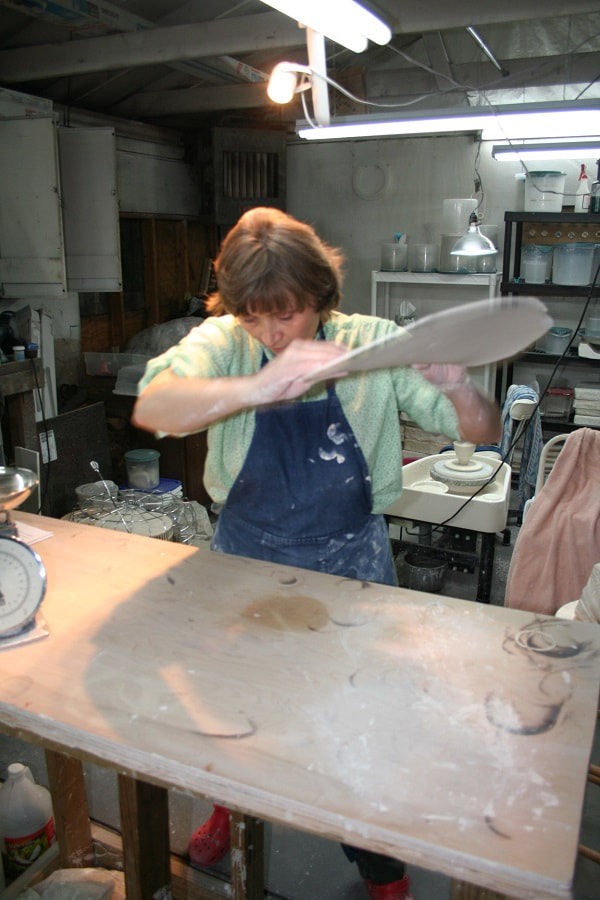 See how the slab grows with repetitive throwing. keep moving the direction in which the slab stretches. |
| It is possible to make many different objects from slabs. The balloon bowls are made from slabs. Many handmade dinnerware pieces starts out from slabs. See the content list from the Hand building dinnerware class. | 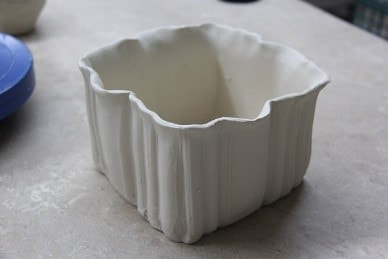 |
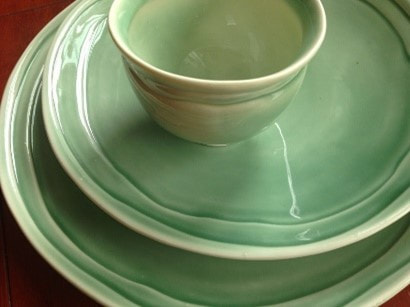
The dinnerware pieces blow were made from slabs
 RSS Feed
 Growing up in Southern Africa, blankets wrapped around people was a natural sight. Some tribes had blankets with specific designs printed and they walked with those blankets wrapped around them all year long; sometimes around the waste, sometimes around their shoulders. The traditional Zulu dress involves wild animal skin wrapped around their wastes. Often one would see them with a rolled up blanket balanced on their heads.
Thinking about blankets and how it is used throughout the ages, I realized and remembered the importance of blankets. My mind mulled over the term blanket and how it is used. A blanket covers the ground.....a mantle, coat, veil, drape, afghan, kaross......many times we 'blanket" one another in an embrace..... Blankets means covering, protection, comfort, warmth, care, love, embrace and anything that has to do with the kindness in this world.......
Any time someone is traumatized, we may even use our bodies to cover and protect.
Tinyke, my daughter made this figurine in 1987, when she was 3 years old.
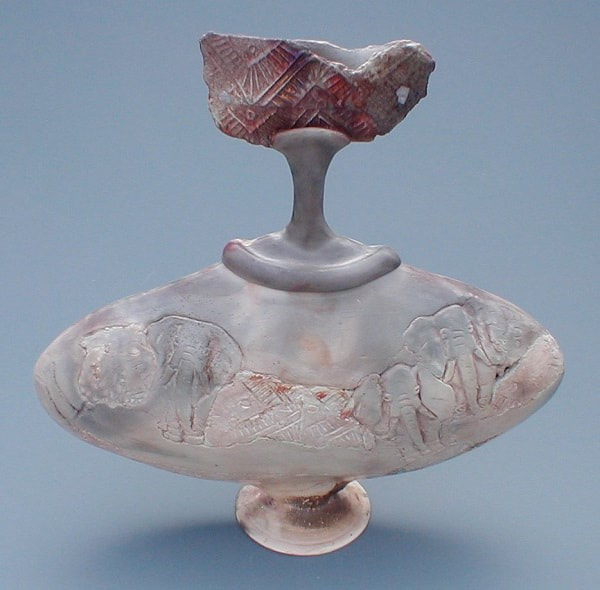
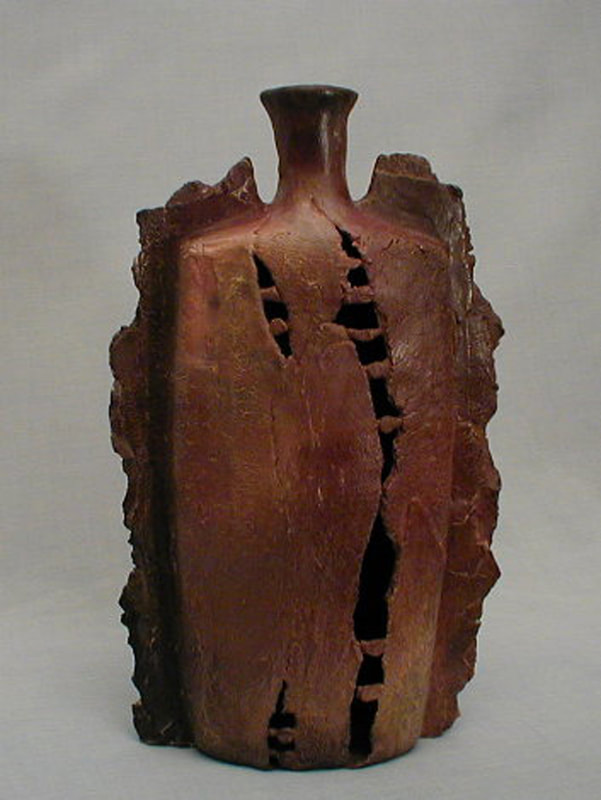
An example of the pit fired work (1995 -2004), prior to started making translucent porcelain. i
I made the first ones of these figurines with blankets wrapped around them when Tinyke, my youngest daughter was about 3 years old. At the time it was simply an image that found its way into my sub-conscience and found its way into my clay work. Lizzie, the black lady who helped me in the house, was also like a second mom to Izalda, Linkie and Tinyke. She was often disciplinary factor, mentor and teacher. Lizzie was also the one that taught my children Christian songs in her language and some other elements from her culture, like how to carry their dolls on their backs held tight by a blanket.See the black woman in South Africa never suffered with colic babies. They carried them on their backs, working their days out, while the soothing rhythmic movement of the mother’s body and the warmth of the blanket worked any uneasiness away. My children was always playing in and around my studio and I often watched them carrying those dolls on their backs, with headscarves around their heads, just like so many of the woman still wear to this day.
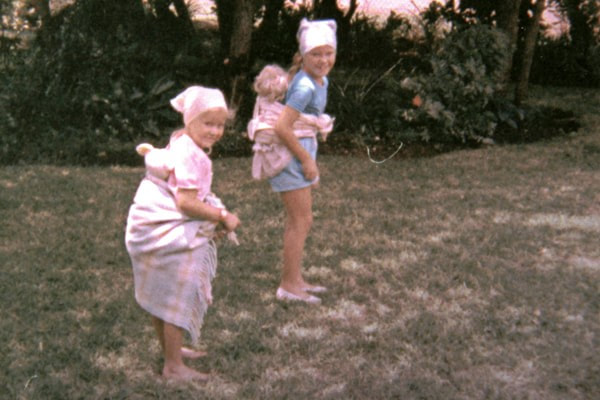
Izalda and Linkie playing with their dolls, mimicking the way African woman carried their babies.
When I first made "Remembrance" a doll wrapped in a blanket, my Christmas ornament, I was touched by the disasters of 2017; Harvey in Texas and bush fires in California was just some of the natural disasters that went on that year and in my own community I have friends that suffered from cancer, that lost loved ones, ended up in accidents and lost personal possessions due to tornadoes. The response came naturally. I felt the need to soothe and comfort where I could.
Just like the Ndebele always wore blankets around their shoulders while the Basotho blankets became a fashion statement, I felt to make a statement in this world where so many needed comfort.
Just like the Ndebele always wore blankets around their shoulders while the Basotho blankets became a fashion statement, I felt to make a statement in this world where so many needed comfort.
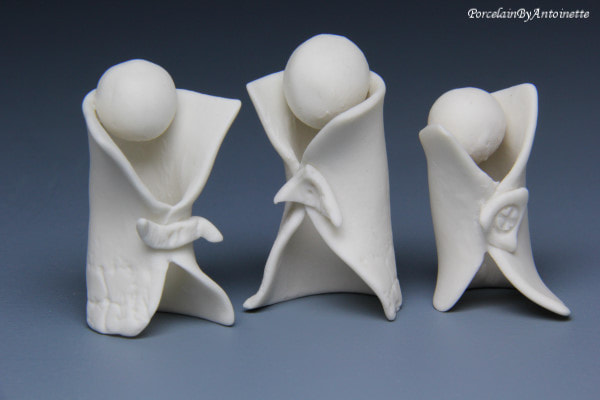
Remembrance figurines in different sizes.
During those days early days in 1987 when I started making the blankets, or coats around these figurines, it was a reference to comfort. As a reminder of my heritage, I kept making these figurines occasionally throughout the years.
In 1999 when we immigrated to the United States and experienced the deep, deep sadness over the loss of country and people, I communicated it through my work: An elephant walking from a broken vessel, a bottle with bars in front of it. The black smoke of darkness that found its way onto some of my art works. The outstanding element of my pit fired porcelain those days however, were figures raising from the wheel thrown vessels. Often woman and often with the richness of necklaces: The trademark of the Ndebele woman.
In 1999 when we immigrated to the United States and experienced the deep, deep sadness over the loss of country and people, I communicated it through my work: An elephant walking from a broken vessel, a bottle with bars in front of it. The black smoke of darkness that found its way onto some of my art works. The outstanding element of my pit fired porcelain those days however, were figures raising from the wheel thrown vessels. Often woman and often with the richness of necklaces: The trademark of the Ndebele woman.

| Some of you may know that one of my very favorite artists of all times is Henry Moore, the sculptor. I only knew his work from images, but his work inspired me since I was a young potter. I never knew why, except that I was always drawn to abstract art, maybe because my message is just the outline to the message that everyone must make out for themselves. | 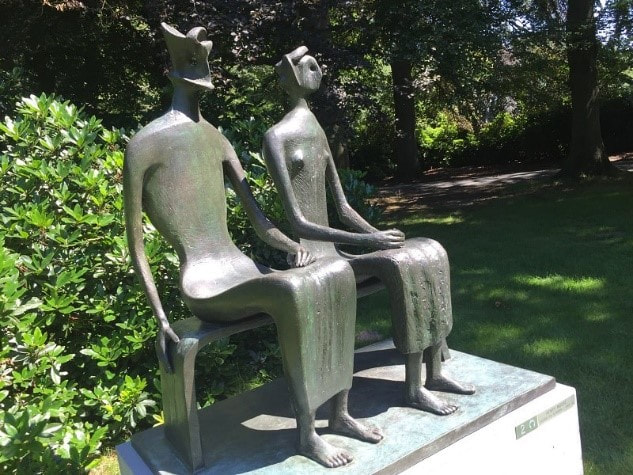 Image of figurative sculptures of Henry Moore taken at the Mannheim Open air Museum in Antwerpen Belgium By Koos Badenhorst |
2020 is a year of devastation. While hurricanes and total catastrophic situations like wild fires, and earthquakes rattled the world, barbaric actions were brought under our attention almost on a daily basis. While all of that were going on, many of us lost family and friends, got word of a devastating illness or struggled in silence with personal situations.
We faced fear, anger and frustration as people lost their income. We got word of the elderly suffering in isolation and we had to observe how even children became isolated behind masks. Insecurity found its way even among those that thought they were secure.
We faced fear, anger and frustration as people lost their income. We got word of the elderly suffering in isolation and we had to observe how even children became isolated behind masks. Insecurity found its way even among those that thought they were secure.
Amidst all of this years difficulties, people were still trying to comfort each other. During times when it looked like everything is falling apart, life still went on and the inherent goodness of people prevails.
In 2017 my Christmas ornament of this year was my beloved little figurine and while it never had a name, I decided this little doll always represented comfort, love, embrace and anything that has to do with the kindness in this world. I remembered those who were suffering and my family and I are keeping them in our prayers on a daily basis. “Remembrance” became a symbol of comfort and joy to people across America.
I found that people walked in throughout the year, ordering these figurines for families to show their continuing love, comfort and support. Therefor what started as a Christmas ornament, is now available yearout in my studio showroom and available to be shipped anywhere in the USA.
I found that people walked in throughout the year, ordering these figurines for families to show their continuing love, comfort and support. Therefor what started as a Christmas ornament, is now available yearout in my studio showroom and available to be shipped anywhere in the USA.
IMAGES FROM MY OCEAN SERIES
For hope
For love
For courage
we Blanket one another
For love
For courage
we Blanket one another
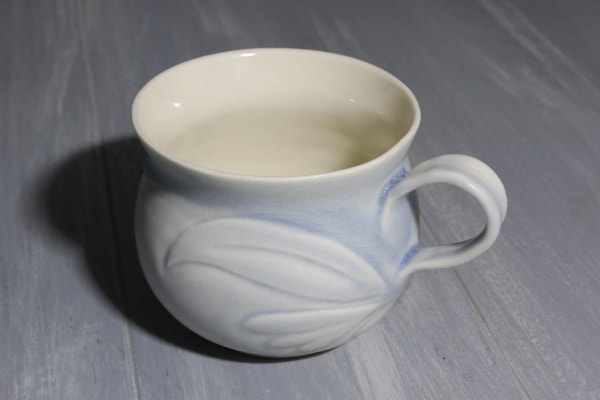
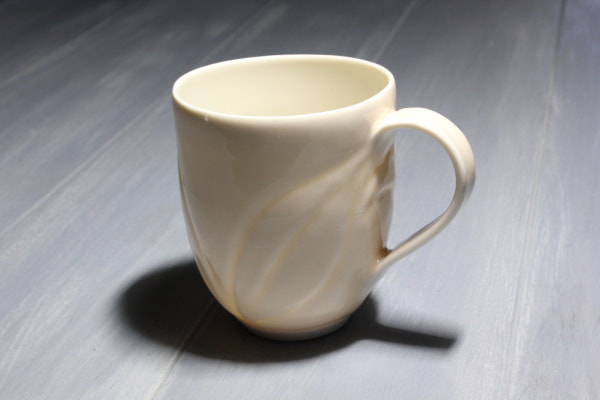
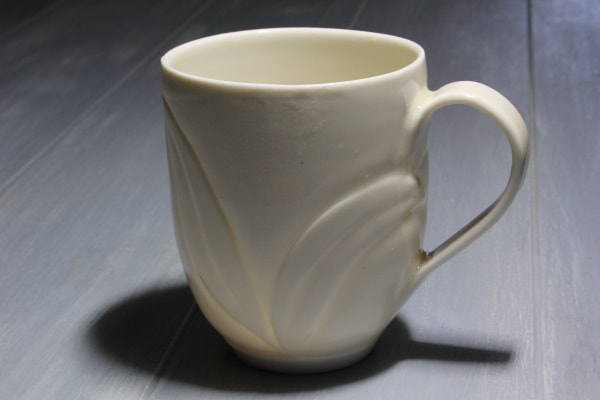
| I was busy sorting through mugs; moving some from my showroom to my kitchen cabinets and some from my kitchen cabinets to the trash pile. If you are as sentimental as I am, any rejects first makes a round through your own kitchen and then you would look for more reasons not to dump it. Sometimes a mug will just beg you to trash it! This one time it became a pottery lesson that everyone should be aware of. I noticed these lines in the image below in one of my porcelain coffee mugs. I knew it was the liner glaze on the inside that was cracking. (Technical term for potters is dunting. ) | 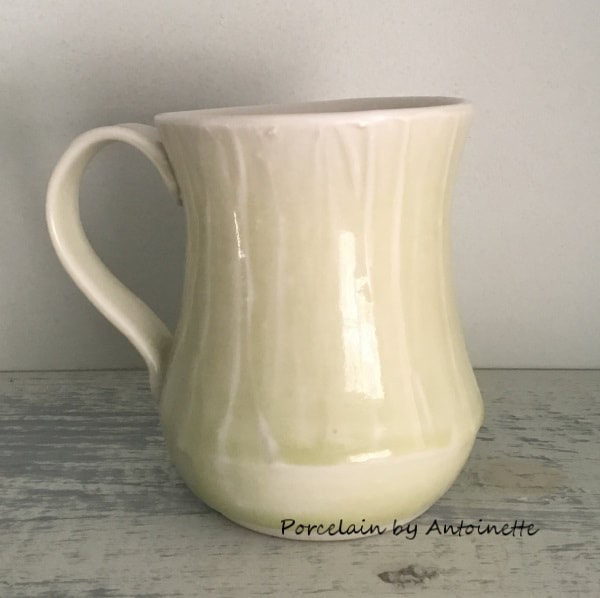 Although this mug looks perfect, it had a crack in the glaze on the inside. |
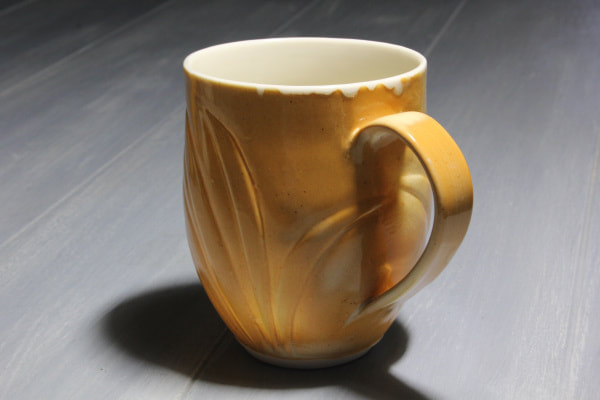
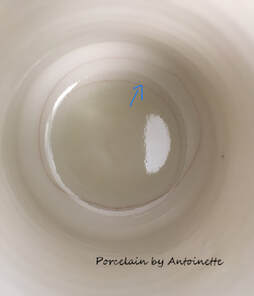 When glaze is applied too thick on the interior, a mug may show stain lines on the inside which are actually coffee stains that seeped into the crack and that would eventually seep out on the shelf. | When glaze is applied too thick on the interior of a mug, it may show clear cracking lines, where coffee in this case, seeped into and stained the crack. The dunt were probably in the clay too, but my bear eye could not see it yet. I would have known over time. Chances were that hot water would have revealed that, either with an explosion of the mug (if I am really unlucky!) or with liquid just seeping out onto the table or in my lap. |
It was very visible in the light colored porcelain mug. (Image above) Many mugs will not show this kind of defect and as you all know, it is the perfect place for dirt and bacteria to gather. Any well vitrified clay object can be subject to too thick layers of glaze and it can be disastrous in any clay body if the problem is not addressed.
I took the mug outside and knocked it on the cement to break it.( Yes I protected my eyes with safety glasses) and I have to tell you, it took me about 5 really hard knocks, before it broke. Did I mention that porcelain is a really strong ceramic medium?
Anyway, the way it broke shows clearly a too thick layer of liner glaze inside the mug (see image below).

A too thick glaze layer is clearly visible on the bottom of this mug shard.
How to prevent dunting in pottery.
Even walls and an even application of glaze on any functional clay object is crucial. In this case the glaze layer was too strong for the clay body. Since it is a clear glaze, it is possible that I double glazed it without realizing the mistake.
Prevent thermal shocking during the firing process. A kiln that is fired too fast or that fires unevenly may cause trouble, not only with dunting, but possibly with warping too.
Obtain knowledge of silica and its behavior in pottery clay and glazes and especially how it will behave during firing of a pottery kiln. ( Silica, often a culprit in the studio, is an interesting topic for potters to review.) See: Kilns suitable for porcelain in the near future.
Potters must make sure their glaze and clay body is a good fit for each other. There are glazes that are simply too strong for the clay body in use and instead of just shivering, it may tear and crumble a pot up into pieces.
Glazing on just one side of a piece, may cause dunting, when the stress of expansion and shrinkage on one side is stronger than the other side.
Large plates, platters and trays often tends to dunt when it is not properly set up in the kiln Learn how to fire plates.
Identify dunting in a clay object
When a crack is long and ongoing with a sharp edge, it is most certainly a dunt. This type of cracking can appear in the clay or the glaze or in both. They may appear vertical, horizontal, spiral or with a ragged edge all over the object.
If the crack is soft and rounded, it means that glaze moved and melted into the crack. The obvious observation is that the crack was there before the glaze melted. This type of crack is unrelated to dunting.
If the crack is soft and rounded, it means that glaze moved and melted into the crack. The obvious observation is that the crack was there before the glaze melted. This type of crack is unrelated to dunting.
How to use pottery in the kitchen
It is important that pottery users realize that they are working with a glass-like product that can break and chip if it is abused in the kitchen.
Here are a few tips to be aware of when you buy pottery.
Always inspect your pottery directly after you received it from any ceramic artist; especially when it is shipped to you.
Make sure it does not have hidden cracks, by tapping with a wooden spoon on the rim. A cracked piece will have a dull sound.
If you are about to subject your pottery to heat or cold, ALWAYS avoid sudden temperature changes. NEVER take a bowl or casserole dish straight from the refrigerator to the oven or vise versa. Not only is it a dangerous practice in which you can get hurt, but you will most certainly loose your precious bowl.
If you observe a crack, understand when it is a dunt and when it is a flaw in the making process. A crack that was formed in the making will have rounded corners, whereas a dunt is sharp.
Be aware that there is such a thing as delayed dunting. By discussing it with the potter, you may help him/her to solve a issue that they may be unaware of.
Links
TeachinArt - Online School of Art
Wheel thrown porcelain dinnerware
Handbuilding porcelain dinnerware
AIC_IAC - International Ceramics Academy of Ceramics
MAC - Mississippi Arts Commission
TeachinArt - Online School of Art
Wheel thrown porcelain dinnerware
Handbuilding porcelain dinnerware
AIC_IAC - International Ceramics Academy of Ceramics
MAC - Mississippi Arts Commission
Antoinette appreciate any comments. Also visit her Porcelain shopping gallery if you are interested in collecting one or more of her ceramic art pieces.
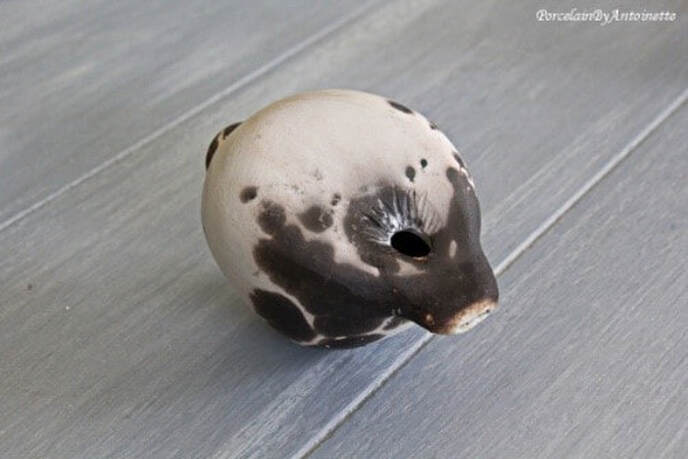
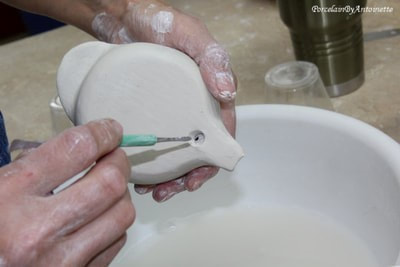
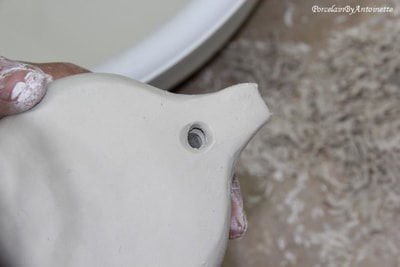
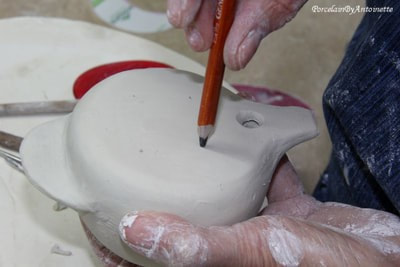
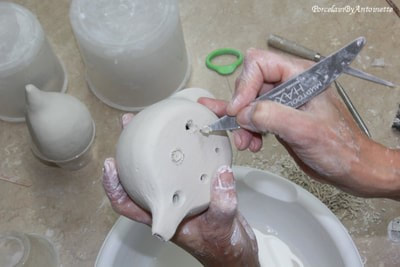
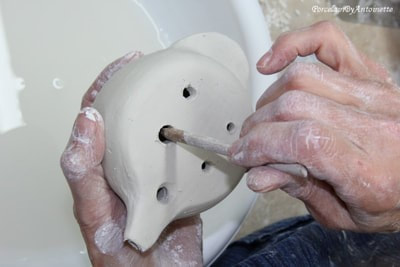
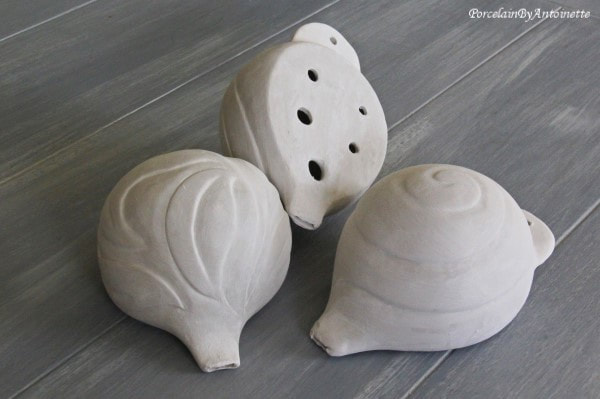 These porcelain ocarinas is unfired. It is possible to play them unfired. Their sound will change when the clay shrinks. Due to its character, porcelain may be fired differently than other clay bodies. | Make an Ocarina with the pinching clay techniqueSome years back while I was working for the first time in the Whole Schools Program in Mississippi, I studied the craft of making ocarinas from clay, so that I can teach school children how to make ocarinas. It is a fun project in which children can be challenged. It is also possible to keep them engaged with the object long after they made it. For some it may become a challenge to learn to make ocarinas that are in tune and it is one of those projects that can become a lifelong hobby or even a career, either as a musician or ocarina maker. It is possible to make many other kinds of musical instruments from clay too. |
Whistles and ocarinas.
| An ocarina is a whistle that can make different musical notes placing your fingers over a set of holes and blowing into the air duct. It is possible to play a tune with at least 1 full octave. It is good to know how to make a whistle first and once you mastered the single note instrument, you can take the next step to make an ocarina. The first thing that should happen is that you get sound, so before you get into the musical scale of an ocarina, make sure you make a good whistle. Your first ocarina may be off pitch, since it is a little harder to create the perfect holes, but it is not impossible. To be able to do that, may require some experimentation and a reliable pitchfork. The most elementary ocarina has 4 holes. The smallest hole is the furthest right side, away from the mouthpiece. Going clockwise the holes should double in size from the previous one in order to obtain one octave. If the sound box (belly) of the ocarina is bigger, the sound is deeper; going higher the smaller the ocarina becomes. | 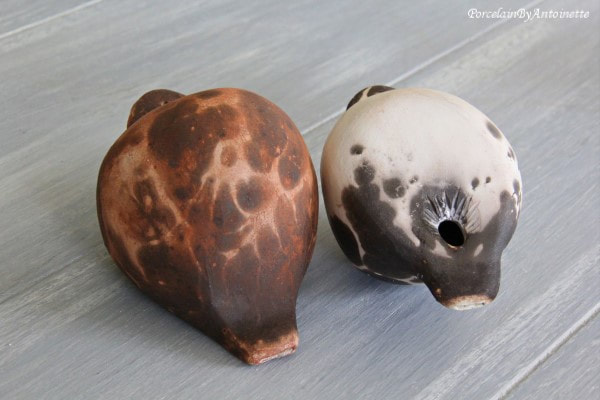 Whistles that was treated in an obvara firing with Marcia Selsor. |
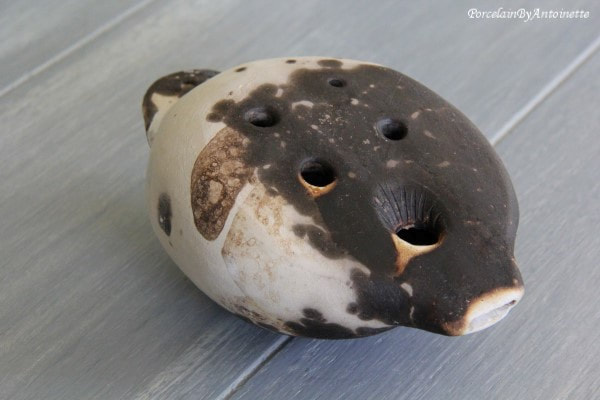
Ocarina treated in an obvara firing with Marcia Selsor when we videotaped her Alternative Firing online workshop.
| You will need a few basic tools and clay It is possible to make these ocarinas from a self drying clay although real pottery clay made from earth will be the easiest to use. If you add paper to the clay and seal it afterwards with glue, paint or some kind of lacquer, it will be hard enough to last. Other tools needed are: Sponge, Sharp(point) knife (fettling), Surform blade, Metal kidney. Needle tool, Sharpened flat popsicle stick, or flat bamboo (like a chisel) Round pencil or dowel stick with a sharp point Sponge on a stick. Paint brush Metal kidney Serated blade Plastic cards | 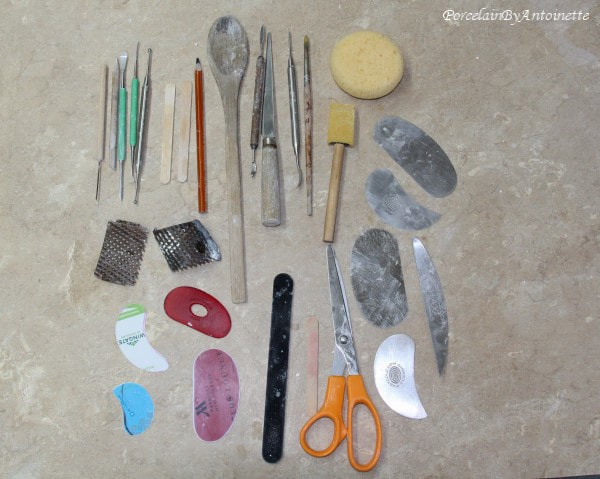 3. A view of the right angle. |
 A basic whistle has only one note. | Keep a damp sponge close by to keep your fingers moist and to smear small stretch marks away. Blow into the air duct to hear a clear sound. If the sound is not clear, it means something is obstructing it. If the clay is too soft it is difficult to clean out well. Bear in mind that you need enough space on top to drill a sound hole and at least 4 note holes in; Form a round belly (sound box) for the ocarina, but the top somewhat square and flat. Form the sound hole and air duct just as with the whistle. I like to widen my sound hole. It is also a good place to allow debris escape from the inside of the belly. Beginning with a small hole, as wide as a pencil lead. Double the size when forming each hole, going clockwise. When you form the air duct, make sure that the air flow is open, by having no obstruction between the sound hole and the air duct. The sharp beveled edge of the sound hole and the air duct should be level with each other to allow a steady stream of air through. |
Tips to be successful with making ocarinas


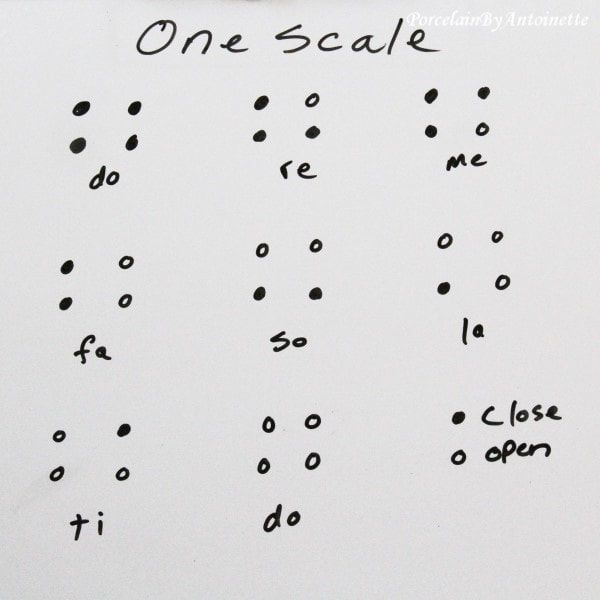
Note chart.
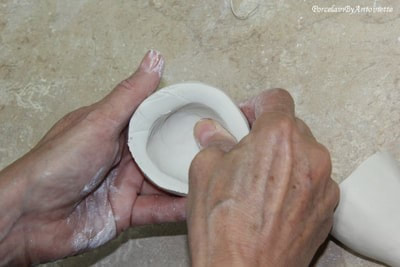
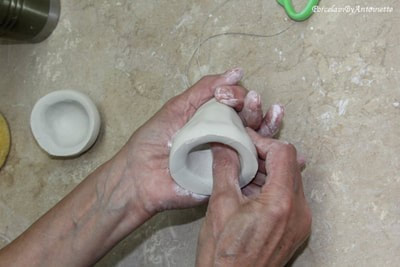
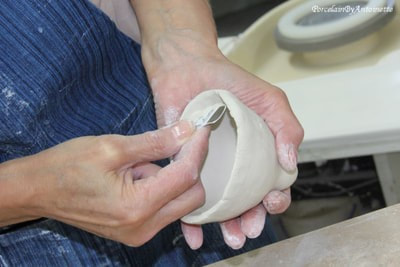
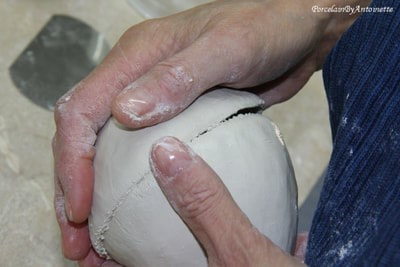
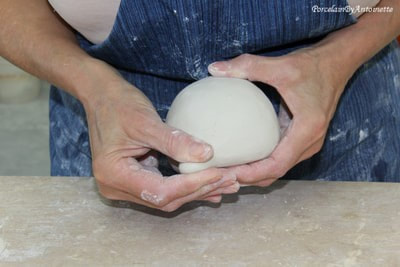
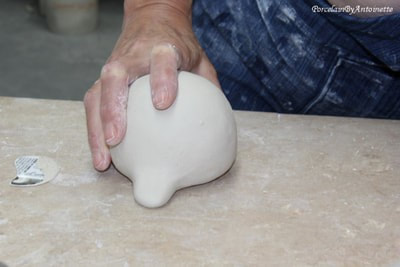
Pinching is one of the oldest if not the oldest known clay techniques. It has always been a good place to start a first experience with clay, but for sure not a beginner’s technique. It is often mistaken to be the easiest technique in clay, because it is a logical place for potential potters to start working with it. The true fact though is that it takes a good bit of practice and skill to create even walls and to make a real piece of art from that small ball of clay in one’s hands.
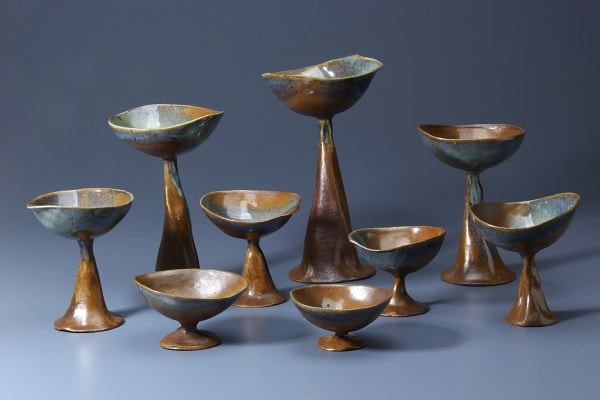
Pinched stoneware bowls on wheel thrown pedestals by Antoinette Badenhorst. Fired in a gas kiln at ^10. Image by Koos Badenhorst
Most beginners do not create perfect pinch pots at first and teachers are often hasty to move them to the next phase and never make sure that they mastered the skill in full. In my opinion that is a mistake, because unless those potters – to - be decides to go back, explore and practice pinch pots, they will always live with the idea that they will never be good at that specific technique, or they will label it as a beginners technique.
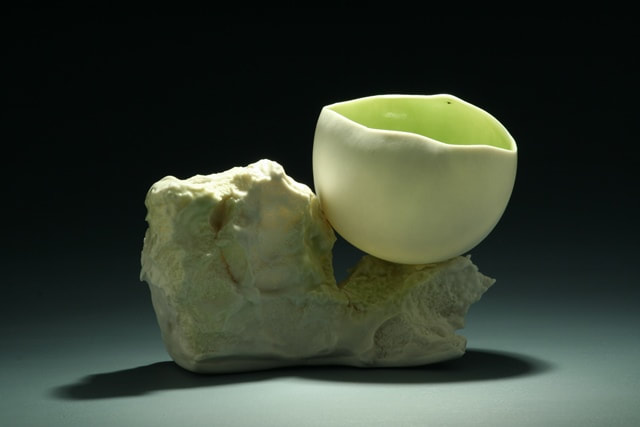
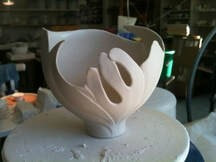
Southern Ice porcelain pinched bowl on a translucent southern ice porcelain basis by Antoinette Badenhorst. Glazed interior with some accent glazes on basis. Fired to ^10 electric.
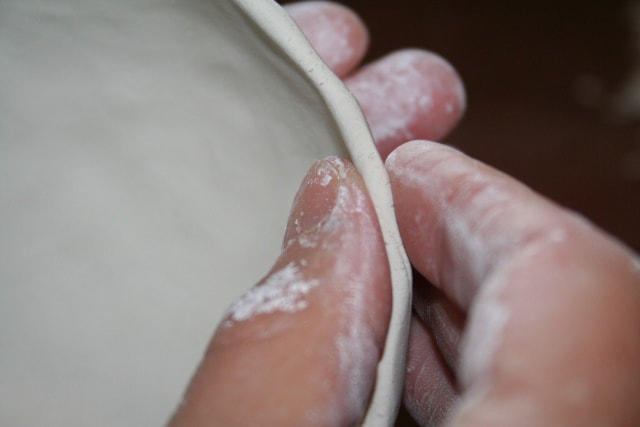
When clay is pressed between thumb, fore-and middle fingers it becomes more compact with every pinch, to make it into a very strong structured object. This is the most direct and often times the most effective way to manipulate clay.
When clay is pressed between thumb, fore-and middle fingers it becomes more compact with every pinch, to make it into a very strong structured object. This is the most direct and often times the most effective way to manipulate clay.

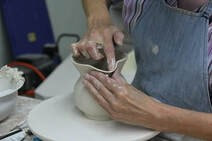
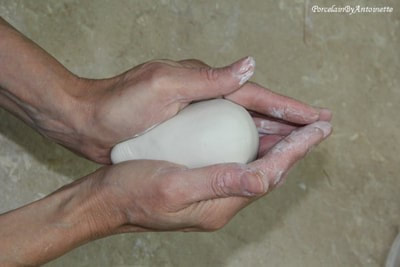
Pinching clay is one of the oldest techniques to manipulate clay. The first way Antoinette like to test the personality of a clay body, is by pinching.
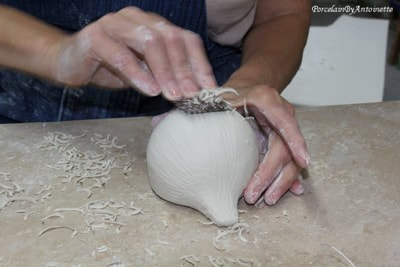
Experienced potters develop a rhythm in which they press firm and evenly all over the clay. As they get to the right thickness, the pinching becomes gentler.
Experienced potters develop a rhythm in which they press firm and evenly all over the clay. As they get to the right thickness, the pinching becomes gentler.
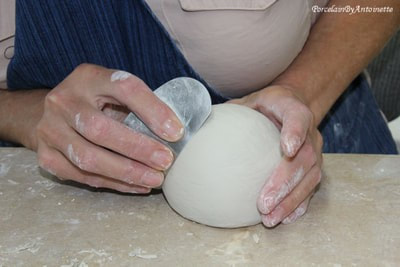
Pinching porcelain clay is one of the best ways to learn to understand and control the clay medium. Pinching and finishing porcelain pinch bowls can be a very rewarding experience. Here Antoinette is pushing the limits. Image by Koos Badenhorst
Whether one pinch hard and deep into a piece of clay or whether one have a gentle soft, but firm approach will depend on the type of clay that the maker have in his hand and that reminds me of how often times I would test a new clay body by tearing a small piece of clay, the size of a small orange off and pinch it into a bowl in my hand.
Whether one pinch hard and deep into a piece of clay or whether one have a gentle soft, but firm approach will depend on the type of clay that the maker have in his hand and that reminds me of how often times I would test a new clay body by tearing a small piece of clay, the size of a small orange off and pinch it into a bowl in my hand.
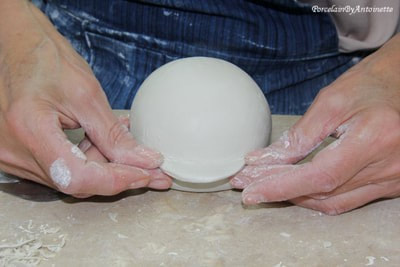
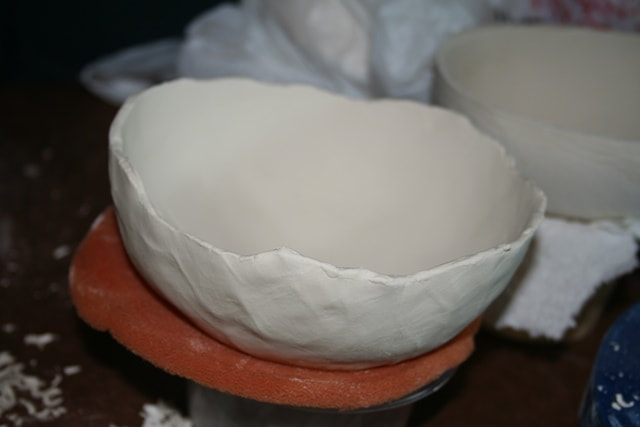
These porcelain pinch bowls are ready to be trimmed. Porcelain clay can be very thin and still be strong. Due to the glass-like quality of porcelain, the clay, fired to maturity, is stronger than any other clay. Antoinette is teaching this technique in her first porcelain e- course. Image by Koos Badenhorst
Different types of clay will act differently and it will convey a message to the user of what it “wants to become”
The way it forms little cracks on the side walls or rim, or stay smooth in the hand, show instant fingerprints or allows itself to be shaped into a smooth open vessel reveals and predicts the future relationship between clay body and potter. The way it tolerates ongoing handling or quickly gets tired of manipulation, the way it allows itself to be shaped and re shaped, the way it allows a finger to smear wet or semi - dry over its surface and finally how easy or difficult it is to finish it off and use different kinds of tools are all ways of telling the handler whether it is a clay body that suits his or her personality.
Is it possible that a pinch pot can stand on its own as an AESTHETIC piece of art?
The answer is without any doubt yes.
Probably the most renowned potter of modern times that pinched perfect pots was the British potter Mary Rodgers. She describes her techniques in her book “Pottery and Porcelain”. Although she often worked with stoneware, her porcelain pieces were outstanding. Today few of these exquisite pieces are still available and if it is available, it sells at breathtaking prices.
Probably the most renowned potter of modern times that pinched perfect pots was the British potter Mary Rodgers. She describes her techniques in her book “Pottery and Porcelain”. Although she often worked with stoneware, her porcelain pieces were outstanding. Today few of these exquisite pieces are still available and if it is available, it sells at breathtaking prices.
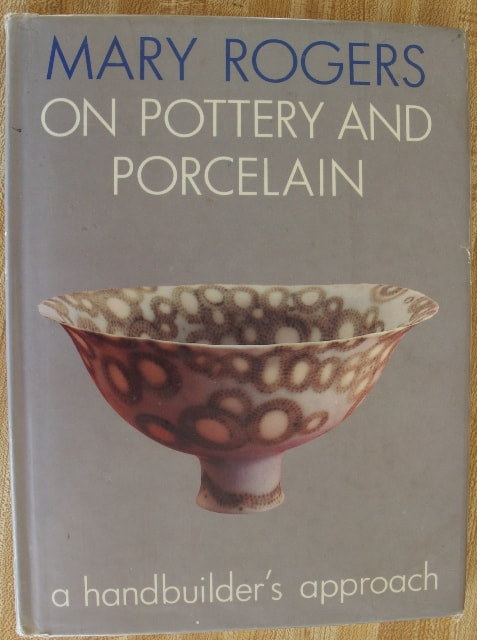
The cover of one of Antoinette's favorite porcelain books. Image by Koos Badenhorst
I have often times created pinch pots from porcelain and must humbly admit that Mary Rodgers always was the inspiration behind my pinch pots. There is something about pinching that becomes a very personal way to express my passion for clay
I have often times created pinch pots from porcelain and must humbly admit that Mary Rodgers always was the inspiration behind my pinch pots. There is something about pinching that becomes a very personal way to express my passion for clay
Antoinette show step by step how to create porcelain cups, plates and other kitchen articles from porcelain clay.
Whether you are making it by hand or on a pottery wheel, she offer 2 classes from which you can choose.
Whether you are making it by hand or on a pottery wheel, she offer 2 classes from which you can choose.
Malelane was paradise. Our children were young preschoolers; in fact Tinyke was a 9 month old baby when we moved there. Koos was working at the sugar mill, a booming new industry for a region that previously relied on vegetables for their daily bread.
I was raised in Namibia, where we only saw flowing rivers when it rained in the Khomas Hochland Mountain, just so that it will run down in a few hours into dry sand beds? So in comparison, Malelane was a true paradise.
It was a luxury to see the Crocodile River constantly running. Drought was not uncommon in this region, but the vegetation was lusciously green after the mostly grayish green landscapes where I grew up. Bougainvillea became trees in comparison with the ones growing in Namibia and I never saw bigger banana leaves than the ones that grew in plantations next to the roads. There were crocodiles and hippopotamus in the river and if you watched closely, you could see elephants or buffalo on the other side of the river in the Kruger National Park. Our favorite leisure time was on Sunday afternoons when we took the children to see animals in and around the river.
My biggest challenge at the time was to get the papayas off the trees in my garden, before the monkeys get it! A papaya showing the slightest hint of yellow was a monkey’s delicacy and they would grab it and then tease me from a distance while they consume it!
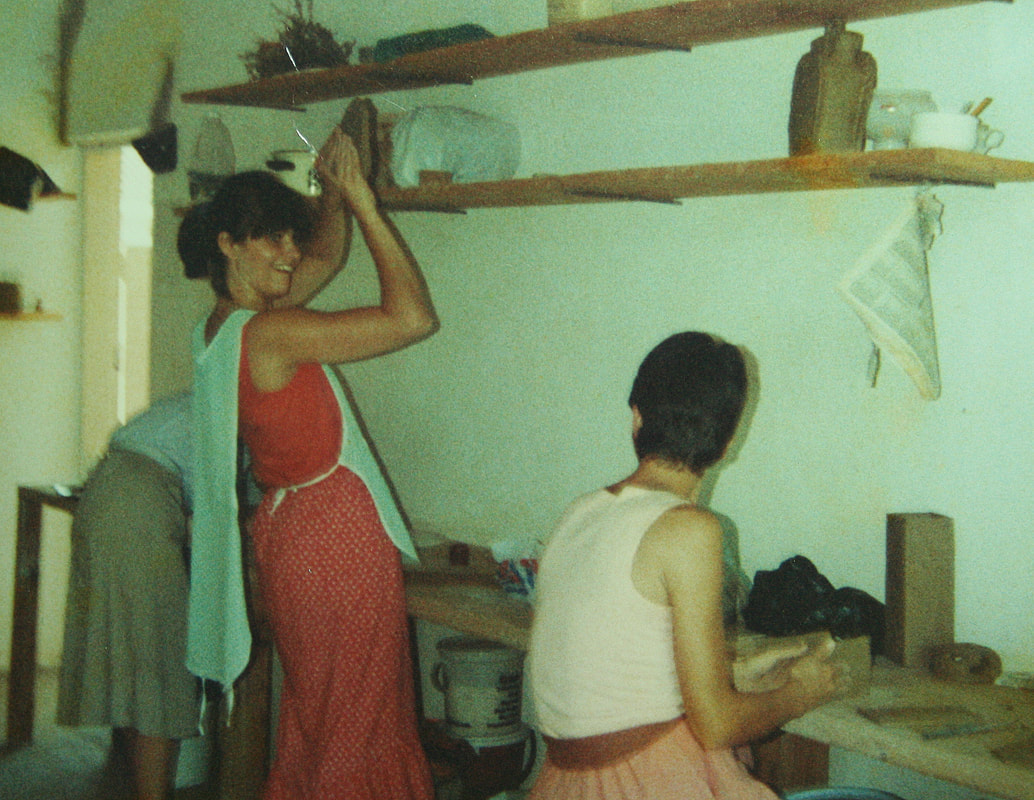
It was a beautiful remote little town, where everybody knew each other and helped raise each other’s children, but it was also a place where we had limited enrichment and adult educational opportunities. The result was that the woman of the town took it upon themselves to do exciting and stimulating projects.
So it happened that I became the regional potter.
I was raised in Namibia, where we only saw flowing rivers when it rained in the Khomas Hochland Mountain, just so that it will run down in a few hours into dry sand beds? So in comparison, Malelane was a true paradise.
It was a luxury to see the Crocodile River constantly running. Drought was not uncommon in this region, but the vegetation was lusciously green after the mostly grayish green landscapes where I grew up. Bougainvillea became trees in comparison with the ones growing in Namibia and I never saw bigger banana leaves than the ones that grew in plantations next to the roads. There were crocodiles and hippopotamus in the river and if you watched closely, you could see elephants or buffalo on the other side of the river in the Kruger National Park. Our favorite leisure time was on Sunday afternoons when we took the children to see animals in and around the river.
My biggest challenge at the time was to get the papayas off the trees in my garden, before the monkeys get it! A papaya showing the slightest hint of yellow was a monkey’s delicacy and they would grab it and then tease me from a distance while they consume it!
It was a beautiful remote little town, where everybody knew each other and helped raise each other’s children, but it was also a place where we had limited enrichment and adult educational opportunities. The result was that the woman of the town took it upon themselves to do exciting and stimulating projects.
So it happened that I became the regional potter.
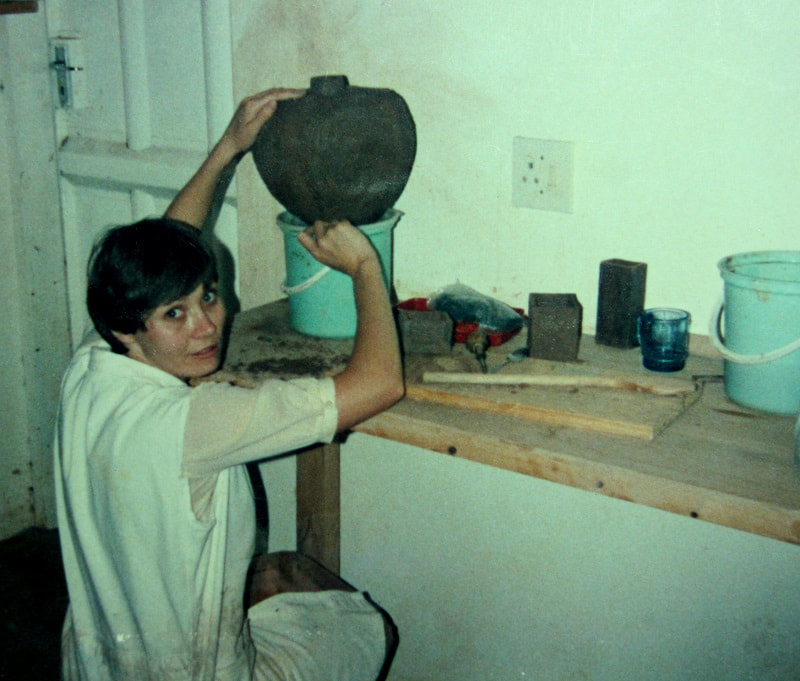
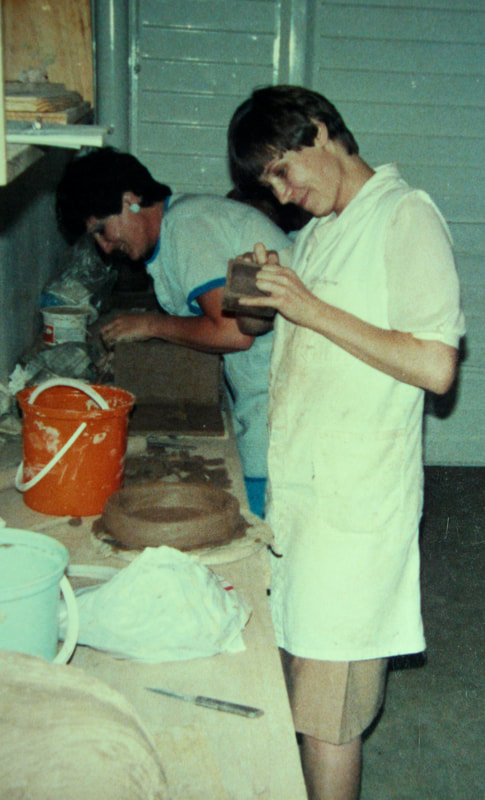
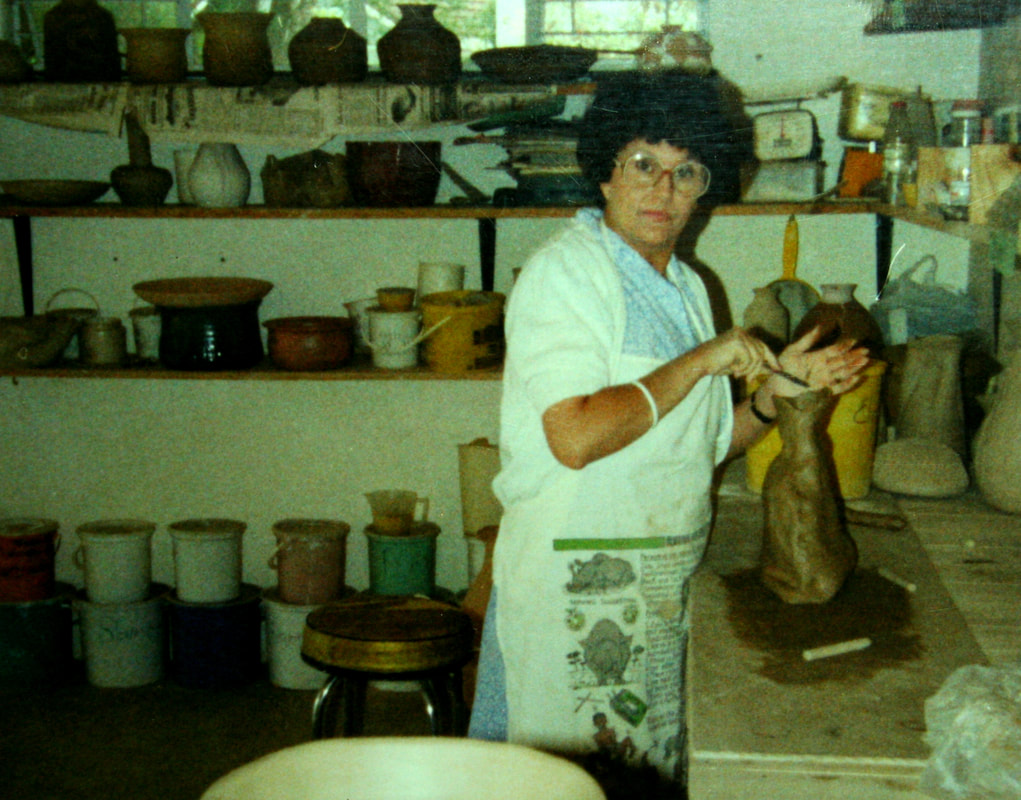
Antoinette working on a hand built coil pot.
My first 3 students were housewives from the community. They had to pay their class fees of R30 (the equivalent of about $1.73 in today’s terms) upfront so that I could buy our first clay. I became the one-eyed king in the land of the blind and I never dreamed that those first pottery lessons would lead to a passion of a lifetime. My pottery career officially took off.
Have you ever noticed how potters transfer images on clay, either by scratching through the surface or by painting on the clay surfaces? As a young potter, the marks that I put on my clay had no particular meaning; at least that was what I was thinking at the time. It was just pure joy to cut and carve and smear and pinch and roll the clay, a willing material that forms and shape in whatever direction it was pinched and pushed.
When I think back, I recall unfinished bottoms and sloppy pots, often times with underdeveloped forms. We did try to smooth it off, but it took several years, before I got the knowledge to finish my work properly. I learned that clay needed to rest and become ready for the next preparation phase with hard lessons. Even though I could see that there were mistakes, I did not have the knowledge to solve it. Pots were thick and it stayed thick! The local library had a few books about pottery and we utilized them as much we could, but the information was scarce and very unsatisfactory and all the information we got were always about the making process, but never about finishing the final product before it goes in the bisque kiln.
During this time we made pots and all kind of objects; from pinching, to coiling to slab built pottery that the clay allowed us to do, never thinking that once we have it fired, it basically would be set in stone, carrying naive finger and cutting marks ; objects that carried the evidence of a small community of potters to be.
It took me five months before I had my first kiln. Someone advertised a kiln for R400 (about $23.11 in current terms) in Nelspruit, a neighboring town. It was time for my next lesson and it was here that my husband showed his weight in gold regarding my pottery adventures.
The kiln was a flimsy old top loader, with broken elements and only two settings: on and off. With the help of technicians, Koos hand coiled elements and before long we had a kiln going!
The kiln was a flimsy old top loader, with broken elements and only two settings: on and off. With the help of technicians, Koos hand coiled elements and before long we had a kiln going!
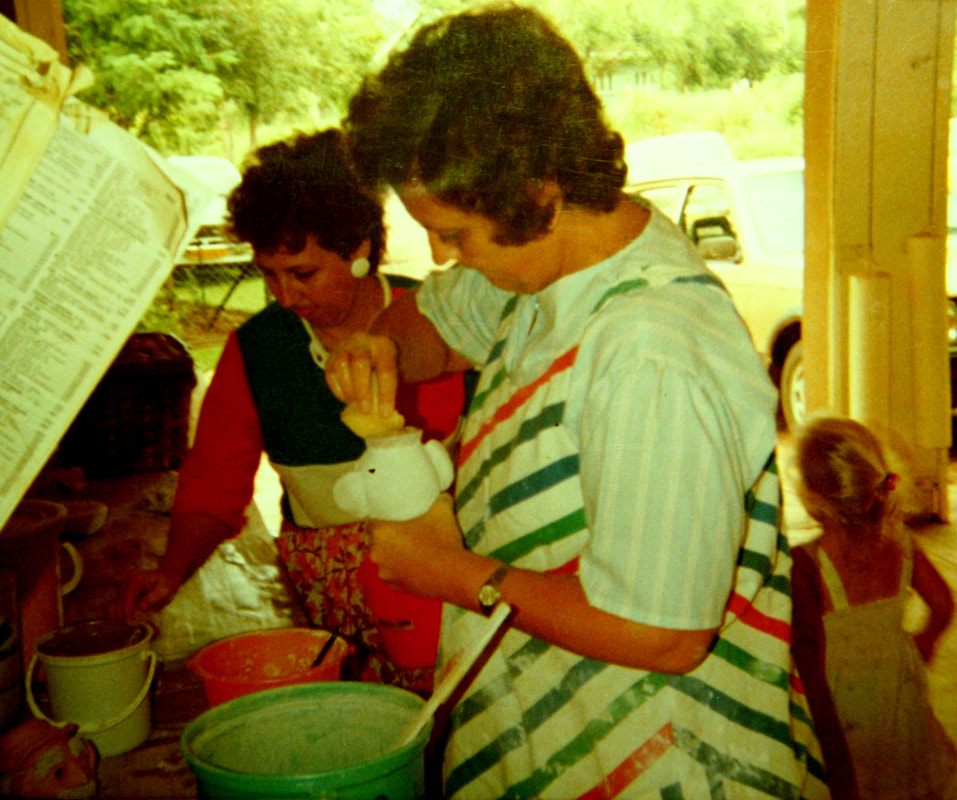
By then I collected enough class fees to buy our first glazes. Not knowing better, I ordered 12 different one kilogram (2.2 lb.) glazes to dip our pots in. Of cause it did not work too well (our pots were too big to dip and we did not know of any other way, so we poured the glaze. We managed though and before long we had our kiln firing. Our first pots were made and we were very proud of ourselves.
As I improved, curiosity sometimes got the best of me and I opened a kiln way too soon, just to end up seeing pots cracking in two right in front of my eyes.
Today I know much better; I teach pottery and porcelain workshops. One of these classes is an online workshop in which I teach potters how to improve their glazes, store bought or self made and how to fire a porcelain kiln successfully.
It took me years to learn and understand that pottery carried a history that stretched far beyond my imagination. I never realized the importance of clay for anthropological research. If my first studio would have been an archaeological site, they will probably find shards, telling interesting stories of us few women that had so much fun in our garage studio and maybe they would find the first signs of the birth of my passion for clay. It became a lifelong love affair, one that I never would have managed, was it not for my dear husband and his patience with me. (oh he still did not eat his hat as he said he would do if I become a potter!)
I mentioned anthropologists. They are very interested in clay objects. Did you know that shards can tell us about ancient technology and human behavior? Since clay is preserved by fire, it carries footprints and cultural evidence that cannot easily be distinguished.
I came across this you tube video that explains how they translate images and marks from clay into historical facts: The presenter has a lively way in which he explains the importance of pottery shards to read ancient history.
I also found this beautiful website with information about the Ancestral Pueblo cultures found in the regions where Arizona, New Mexico, Utah and Colorado meets, known as “The Four Corner area” It is believed that the Pueblo people descended from nomadic living styles and gathered here some 12 thousand years ago. Their pottery has a significant influence on American pottery; to this day.
I was not fortunate enough to learn about clay through generational inheritance, as the ancient people probably did. I did not even know at first that clay is earth and it was a big "aha" moment for me when I realized that clay in a kiln and rocks forming from lava has strong similarities. When I decided I have to start teaching pottery, I never thought that I started on a path in which I created footprints that may have some permanence. Having that knowledge now, puts an obligation on me to make sure that any piece I fire, not just holds beauty in its core, but also an intelligence of good craftsmanship and expressional value to last for millenniums to come.
 |  |
I partook in one of America’s most prestigious shows (American Craft Expo). Was it not that I still have so much to learn, I might have thought that I finally came full circle, but after almost 40 years I can say, I know what I still don’t know…….at least I think I can guess……
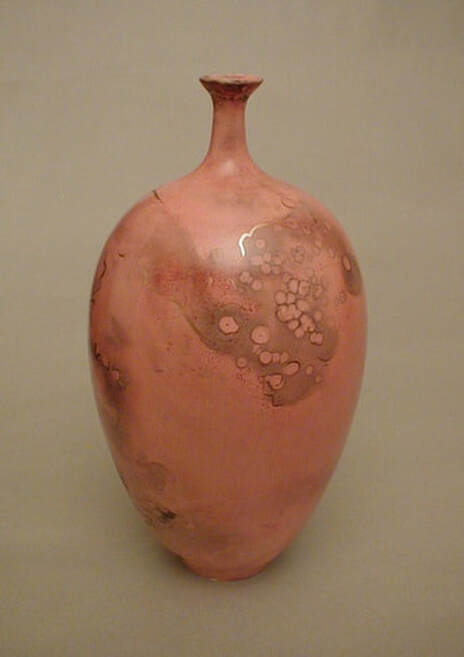
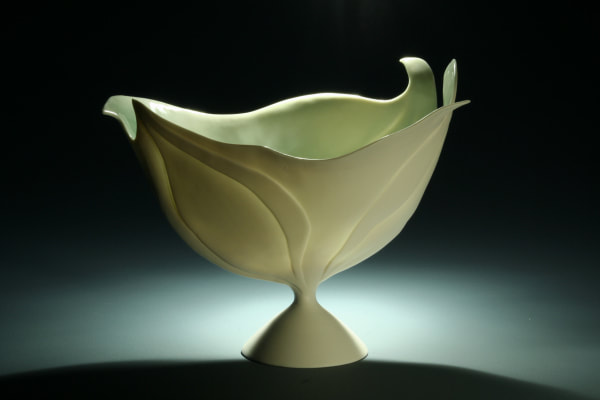
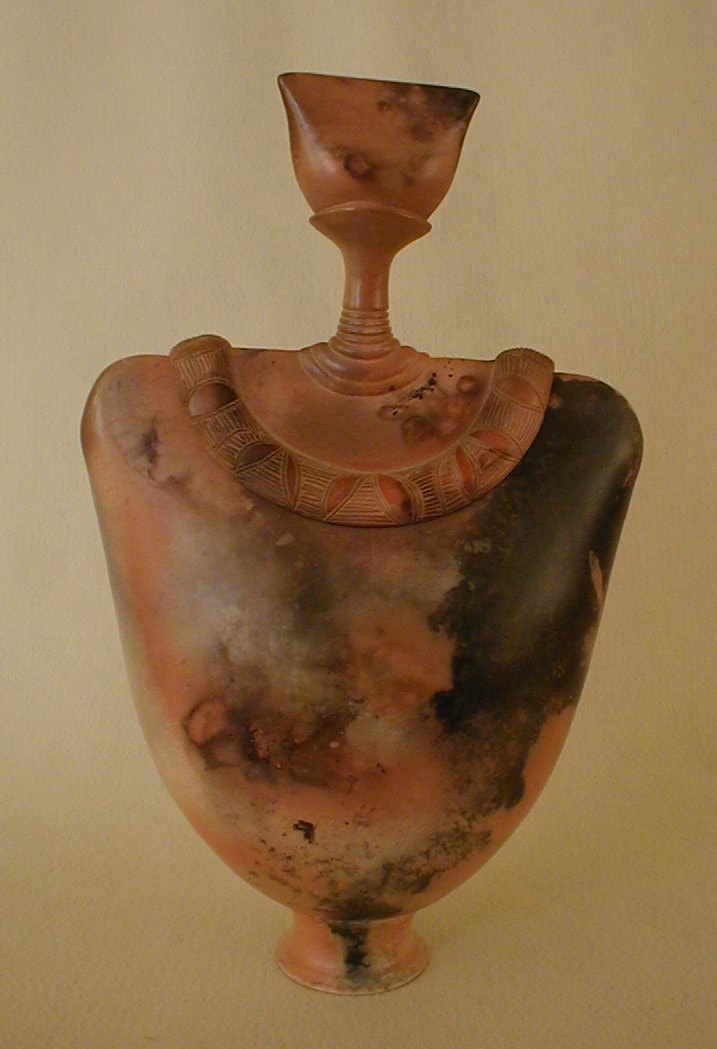
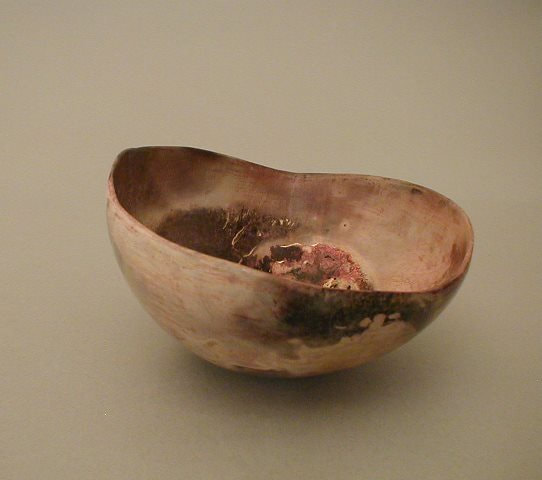
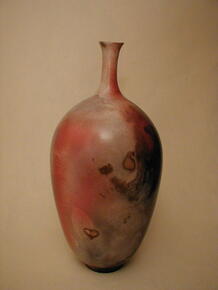
Earlier pit fired porcelain bottle by Antoinette Badenhorst.
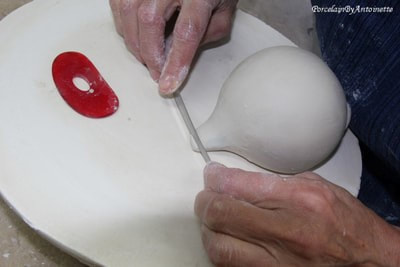
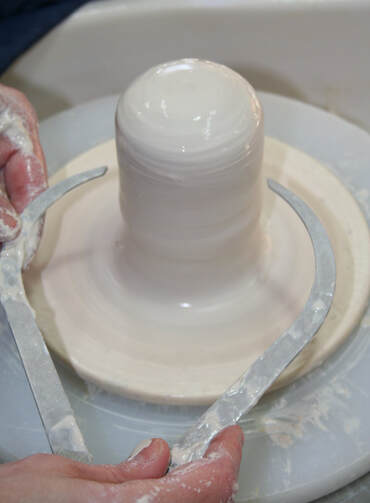
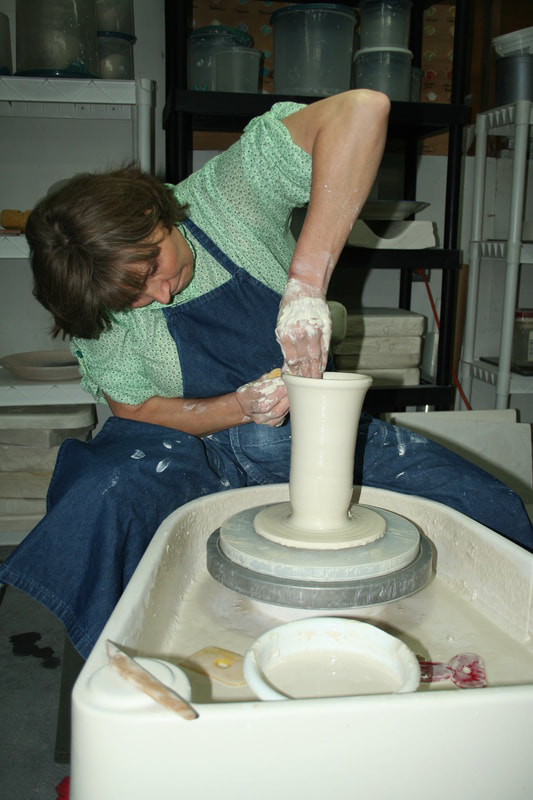
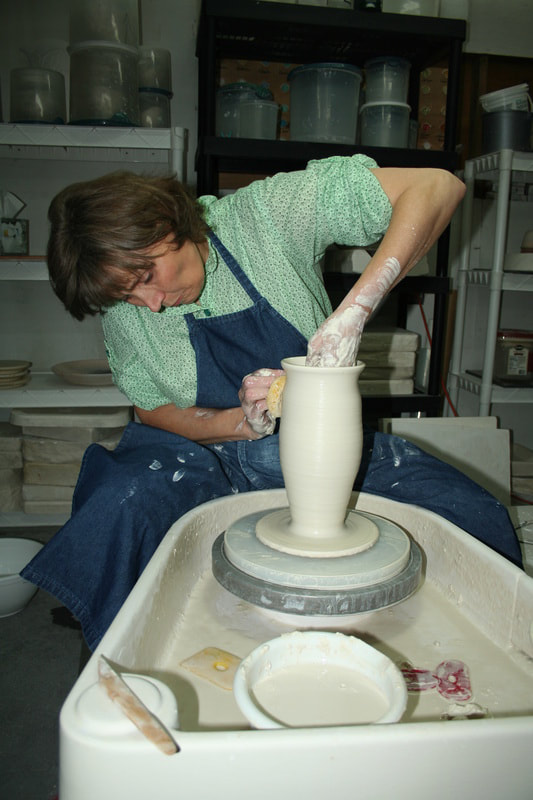
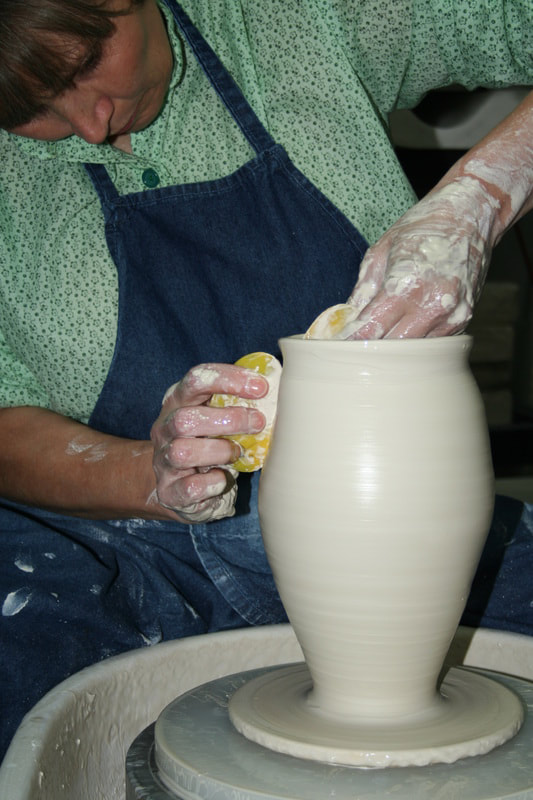
The throwing of a bottle requires specific planning. When working with porcelain it may take a little more planning, since the diva would not work along unless you do it "her" way. In this series of images I am showing you how I do it.
Be sure to wedge and center the clay properly The width of the dome before the opening of the clay, is an indication of how wide the bottle will be at the bottom.
Open the clay so that you have a round curve in the interior bottom. This will help to form a rounded curve at the base.
Push a dent at the bottom of the pot to be able to move a wall of clay upward.
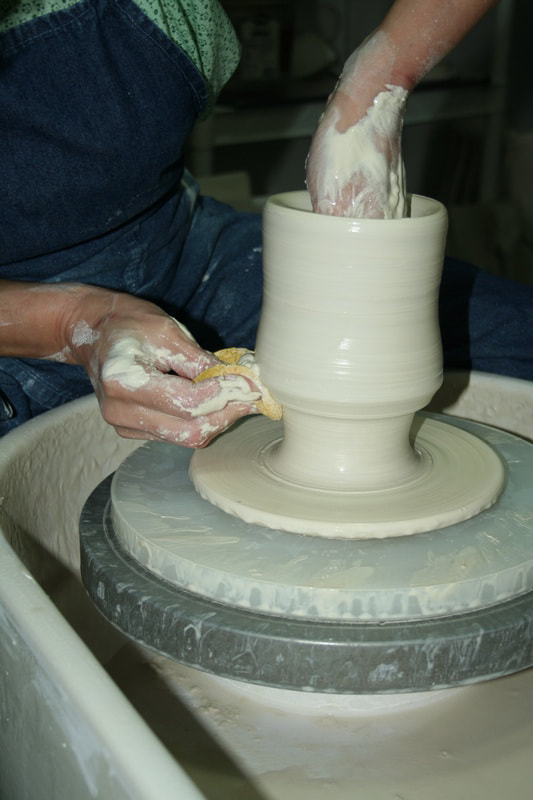
Rather than pulling, push the clay up.
Keep pushing the "clay-wave" up right to the top. If you have to stop in- between, do so, but continue where you stopped.
Note the direction of my arm. That helps to keep the cylinder narrow and going upward instead of flaring open.
Keep pushing the clay-wave up right to the top.
Strengthen the clay rim by running over it and gently forcing the clay into the wall.(repeat this pushing process from bottom to rim at least 3 times)
Keep pushing the clay-wave up right to the top.
Strengthen the clay rim by running over it and gently forcing the clay into the wall.(repeat this pushing process from bottom to rim at least 3 times)
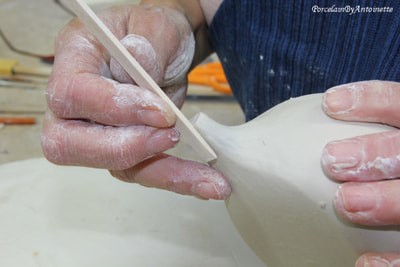
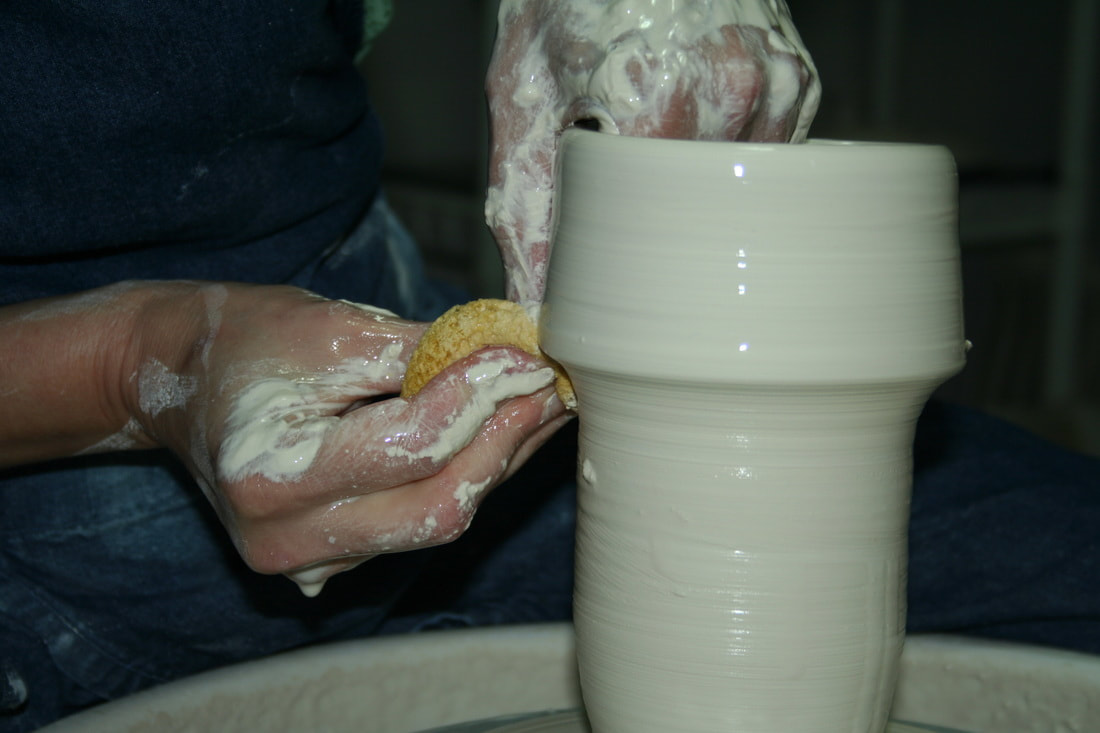
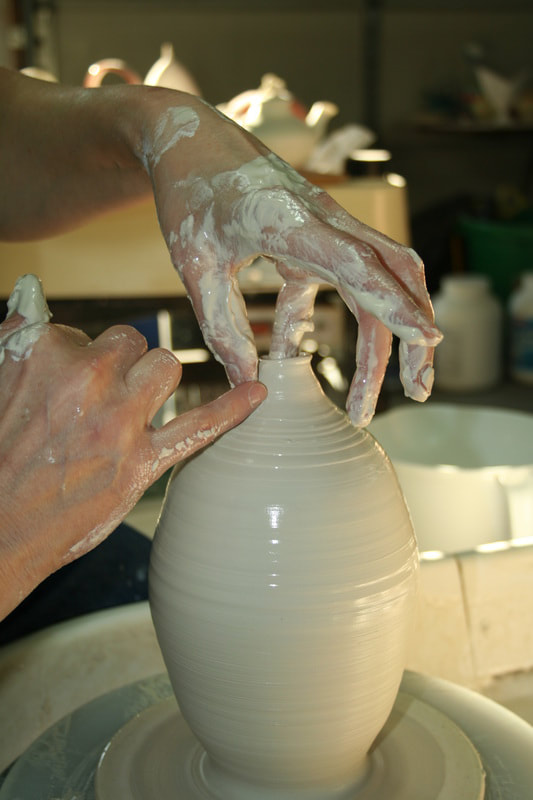
The curve forms when your hands start to push the wall in and outward. Also notice how the position of my arm changes. When the interior hand pushes the clay wall outward and move it upward at the same time, a belly starts to form. At this time the outer hand (which is normally the dominant hand) will follow on the outside just below the inner hand.
When the hands change position, where the outside hand gets above the inner hand, the bellying stops and the clay move inward, closing in. Keep removing slurry and excess water all the time while throwing.

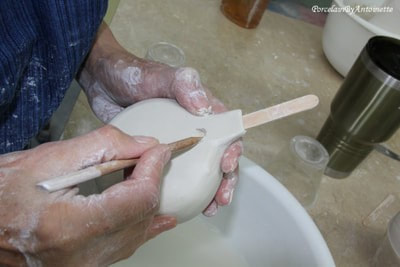
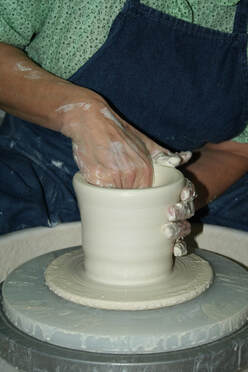
When the clay mouth becomes narrow enough for the hands to cup around the rim, it is time to collar the clay.
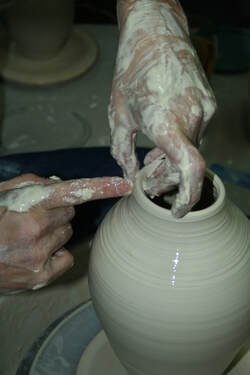
As the clay collar, it becomes thicker again and more clay becomes available to enclose the form and to make a spout. This is a critical time, since the clay is been worked a lot and it can easily collapse. Firm, but gentle touch and often a slightly increased speed of the wheel is necessary to keep the curve up. If you are a beginner doing pot for the first time, a 10 to 15 minute break to allow the clay to dry of some may help.
Keep collaring.
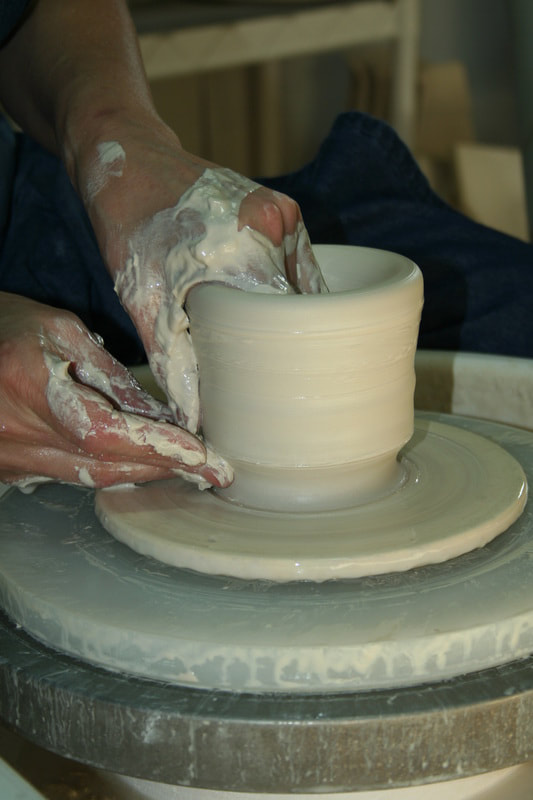
Push the clay up to form the spout.
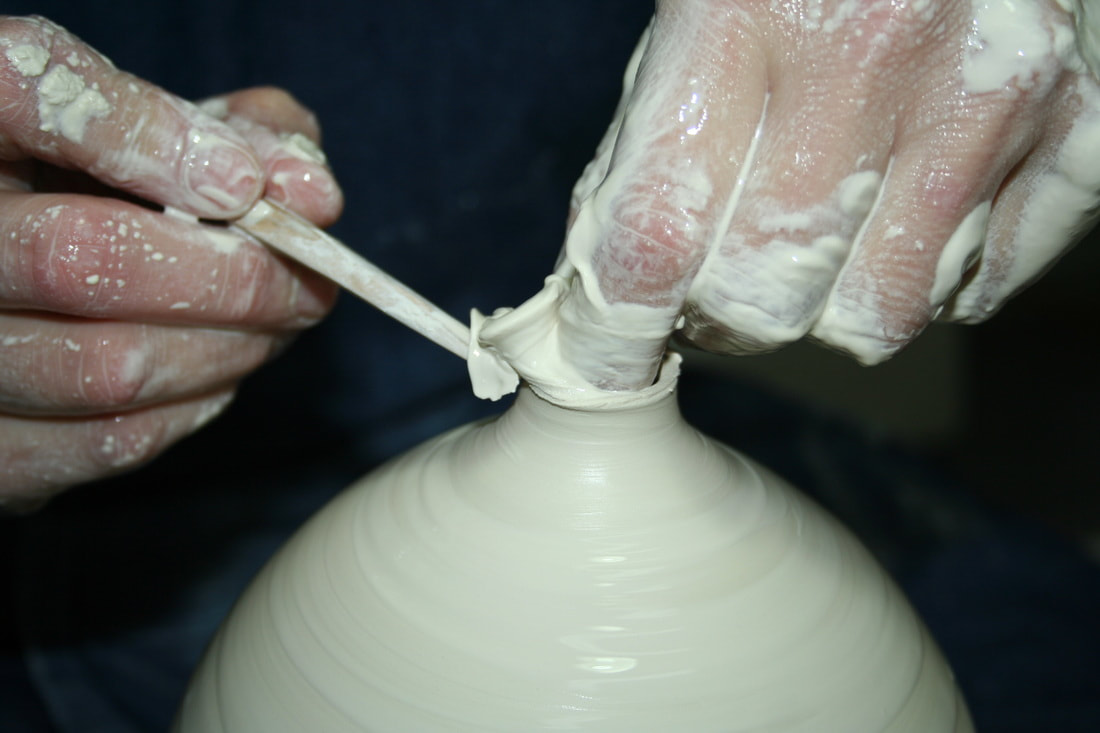
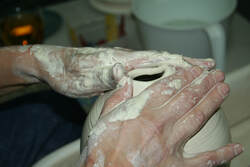
Cut the rim straight with sharp tool if needed.
Move the clay with the one pinkie up against the other pinkie, which is in a supportive role at this stage.
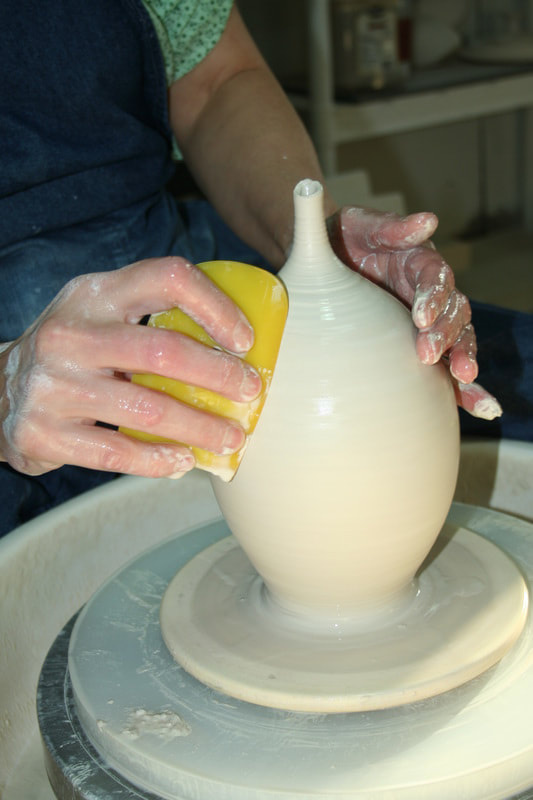
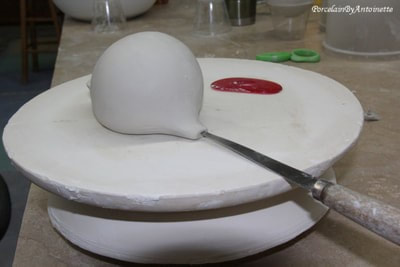
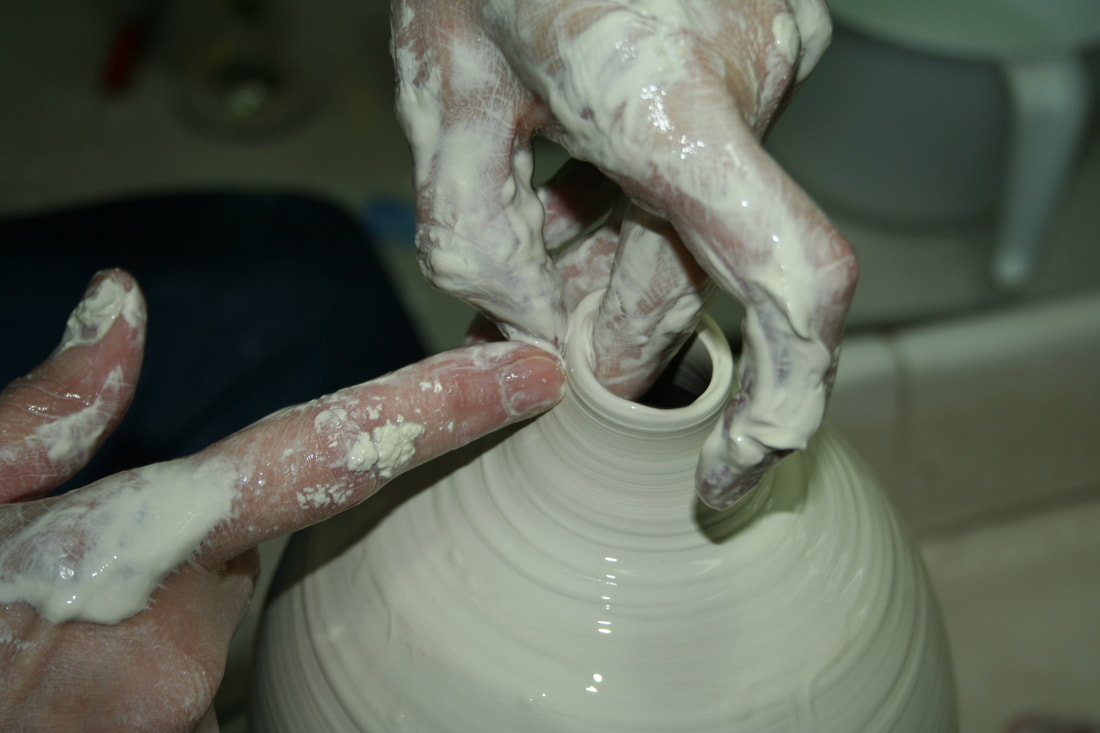
Run a kidney up against the curve of the pot to remove excess slurry and to smooth the pot and allow the eye to move pleasantly and without obstruction over the curve.
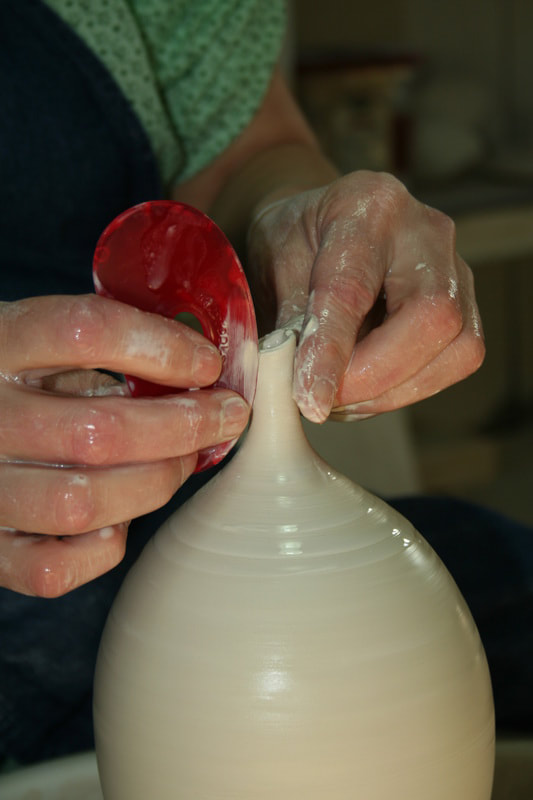
Move the kidney up against the spout to help the transition between pot and spout become smooth.
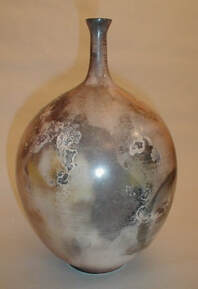
The bottles below were made in the early 2000's by Antoinette.
 |  |
Tips to throw a bottle successfully on the wheel.
Work very sparingly with water. More so when you throw with porcelain since the clay is thirsty and will collapse faster. Rather use little amounts of water more often that a big handful. Dipping fingers in the water is often times enough. I like to use a sponge and keep it lightly lubricated.
It takes experience to know when you need to start making the belly. Leave the pot at least a quarter of an inch thick so that there are enough clay to expand into a curve.
The top third is normally a good starting place to start narrowing the bottle.
Run a kidney (slightly bent between your fingers) from bottom to top to take out any ridges that may obstruct the flow of the curve.
Have fun, keep practicing and let me know how this method works for you. maybe you have a special tip to share here.
Keep following, because I will share more educational ceramic information here.
If you like what you see and get, please share it with your friends.
Below are comments that I copied from my previous web server. feel free to continue with comments
Thanks for the "push" vs. "pull" technique. Will try to indent and see results. Will use some porcelain at Elgin Community College this semester. Hope all is well in Mississippi with you and Koos.
Reply
Antoinettelink
1/20/2014 04:47:18 pm
Great to hear from you Corky! We are doing very well while I hear you guys are cold this year! Hope your studio is warm. Let me know if the technique works for you.
Reply
Elize Kruger
1/20/2014 07:17:02 pm
Hi Antoinette, Thanks! Have you got dates yet for your Durban workshop?
Reply
Antoinettelink
1/21/2014 04:14:12 am
I sent my info to some people there Elize .You can e-mail me and I will give you their names, but I guess they will have to work it through before letting me know. I have a great workshop coming up in Bryanston with Colleen Lehmkuhl and a few more in the pipeline.
Reply
Rosemary Hobson
1/21/2014 05:00:50 am
I am so looking forward to meeting you at your workshop with Colleen. Your work is very inspirational.love and light Rose Hobson.
Antoinettelink
1/21/2014 07:12:35 am
Thanks Rose,I trust I will be able to teach you my techniques and you will be able to make your own beautiful works.
Reply
John Lesondak
1/21/2014 07:20:10 am
Now I'm really going to import some porcelain from France (our closest distributor). This is sheer delight to observe. But I MUST be doing it too. The photos were simply excellent (that "move the clay with one pinkie" frame is simply perfect. Thank you.
Reply
Antoinettelink
1/21/2014 07:42:41 am
You are so welcome John. Next time you come back to the States, bring us a small piece of Limoges with you if you can. Just make sure it is dried in full, for flight purposes. I am very curious about it. Hope to see you in one of my future classes. Just got the next date from Mike Lalone for 2015 too..............
Reply
Greta Michelle Joachimlink
1/21/2014 08:09:34 am
This is wonderful Antoinette. I am glad you decided to do this and I look forward to the e-course. How much clay are you working with in this how to?
Reply
Antoinettelink
1/21/2014 09:18:23 am
Greta, it is a while since I made this specific slide presentation, but I am guessing it was about 1.5- 2 lbs. That is the beauty of porcelain: big results with a little biddy clay.
Also: it is basically put together from 2 different pots. I took the best images to get a continuous presentation.
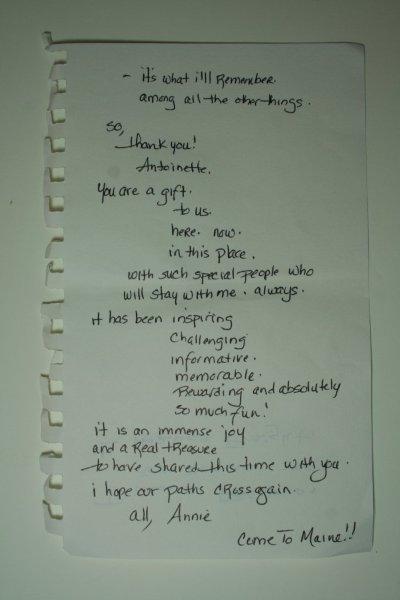
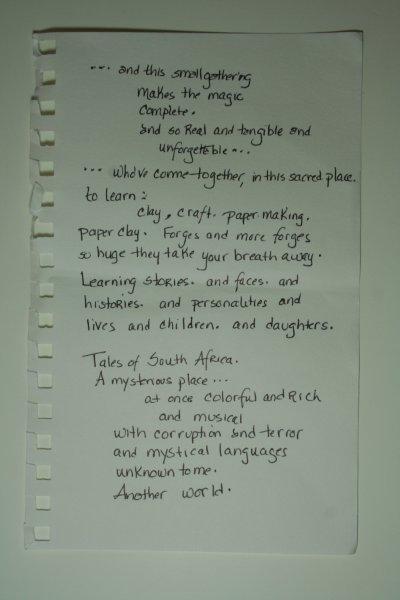
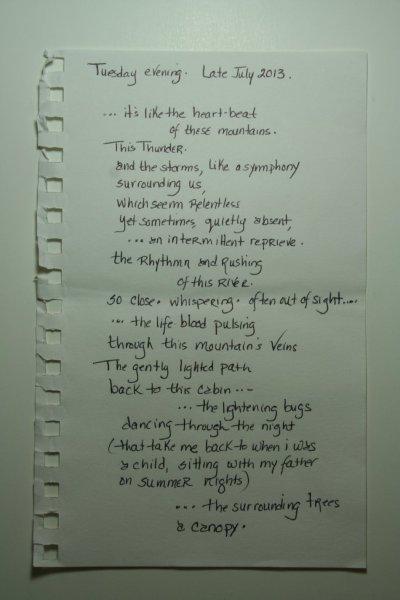
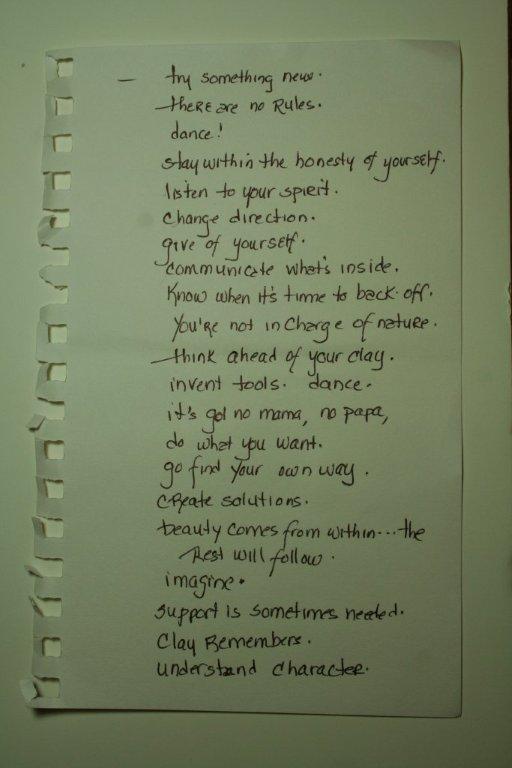
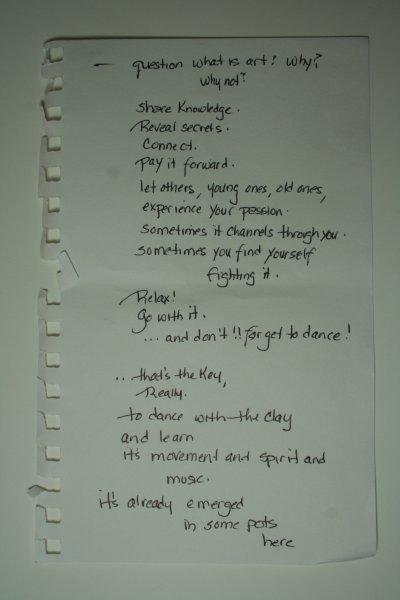
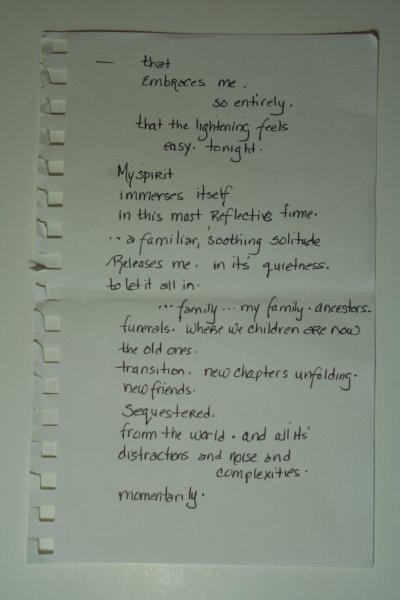
Every once in a while all of us experience something that will stay with us for the rest of our lives. I had such a chance this past week at the close of our hands-on porcelain workshop in Pennsylvania.
The group was small. We all learned from each other all week long in the open pottery studio, while it was pleasantly raining outside and we had opportunities to share life experiences, pottery experiences and more.
At the end of the week Annie Carlsson surprised us with her writing talent. Her observations of the week were documented in a beautiful essay. It was a gift to me and touched me so much that I asked her if I could share it with you on my blog and with her permission I am giving you a glimpse of our week there.
I could not get myself to type her letter, since I thought it will contaminate the authenticity, so I asked my always willing husband, Koos Badenhorst to take pictures of the essay.
Annie I will always cherish it. Your essay highlighted an already extraordinary week. Thank you Annie, Briget, Hannah, Pam, Jeff, Eric and Lee. Without your presence, attitude and help, I would have been a lost case. I will remember this week for the rest of my life.
I teach porcelain workshops around the world in either an online workshop with TeachinArt, or hands-on somewhere in the world.
Places where I would still like to teach is Australia, New Zealand, India, Greece, South America and Asia. If anyone is interested in hosting a workshop in future, you can check out my workshop proposals and contact me.
Places where I would still like to teach is Australia, New Zealand, India, Greece, South America and Asia. If anyone is interested in hosting a workshop in future, you can check out my workshop proposals and contact me.
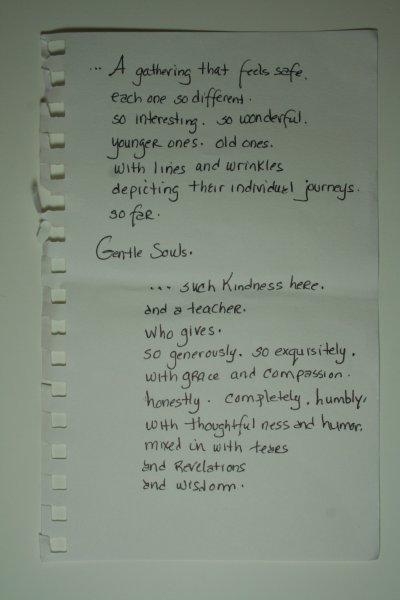
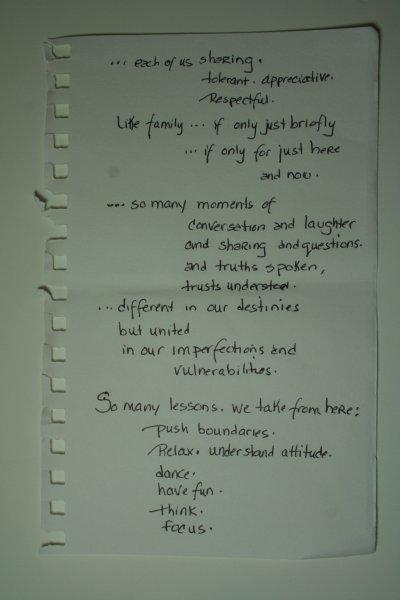
Annie Carlsson commentary letter from the workshop
 |  |
 |  |
 |  |
 |  |
2021 Workshops
2021 - Italy: La Meridiana
Blog
Categories
All
Agateware
Arts Integration In Schools
Begin A Pottery Business
Clay Flute
Clay Slabs For Dinnerware
Destruction Of Art Or Creating Art
Figurines
Kilns Suitable For Porcelain
Kitchenware
Mississippi Arts Commission Fellowship Report
Ocarina
Pinching Clay
Porcelain Tips
Porcelain Workshops
Pottery In Pretoria
Salt In The Pitfire
Throwing On The Pottery Wheel.